Instantiate Service, VNF, VF modules and Network
Overview
Using VID with A-La-Carte method means that the user needs to performed by himself the instantiation of each object: service, VNF(s), VF module(s), network(s).
ONAP to VIM interactions will occurs when instantiating/deleting VF module(s) or Network(s). In case of an Openstack VIM, Heat Stack(s) will be created/deleted.
In the following description, the service model in SDC was composed of 1 VF and 1 Virtual Link (Generic Neutron Network)
Note
For doing this make sure that while Service Design drag the created VF and Generic NetronNet Virtual Link (under Generic/Network Elemntes list) from the Elements palette to the canvas then connect as mentoned in Create Service section of Service Design under Composition
To be able to instantiate VF-module or Network object, some data need to be declared in ONAP SDNC using SDNC Rest API. It is the place where to put the instance specific values such as an IP address value specific to the VNF instance for example.
In VID, terminologies are sometimes different than in other components:
VNF in VID = VF in SDC
Node instance = VF in SDC
Network = Virtual Link in SDC
Pre-requisites
Pre-instantiation operations must have been performed in AAI and VID, via Rest API, to declare some values for:
Subscriber Name (= customer in AAI)
Service Type or product family (= service subscription in AAI)
Project
Owning Entity
Line Of Business
Platform
LCP Region (= CloudOwner/RegionId in AAI)
Tenant
See, in the ONAP User Guides, section about adding a CloudSite and section about pre-instantiation Operations
Note
Robot demo script will be used to populate demo models automatically with Demonstration as Subscriber Name in VID by running “demo-k8s.sh onap init”
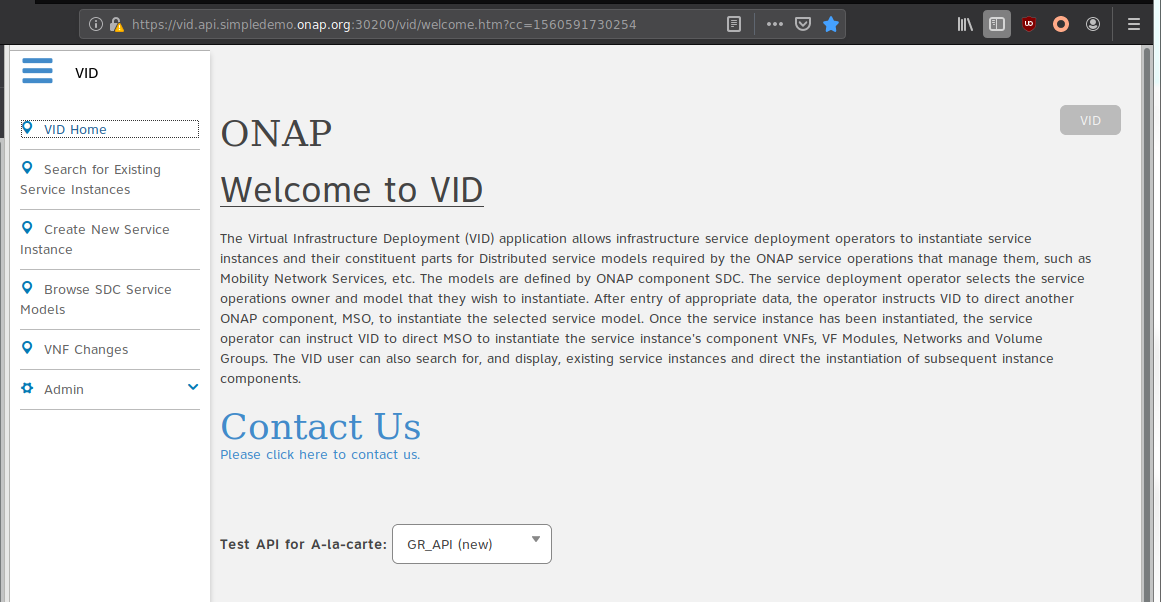
Access to VID portal

Select the VID icon
Here after, the VID Home page starts
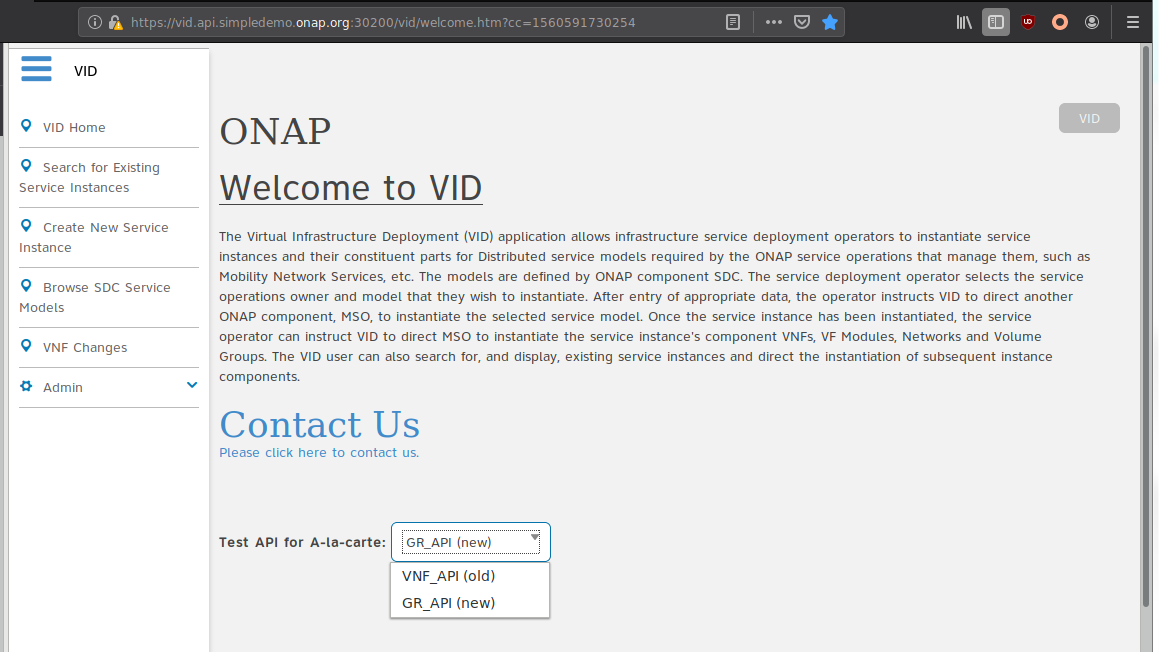
SDNC API selection
Select the API for “A-la-carte”
There are two choices:
VNF_API (old) : VID will use the (old) “VNF” SDNC API to get/check some parameters
GR_API (new) : VID will use the “Generic Resource” SDNC API to get/check some parameters
Instantiate Service in “A-la-carte” mode
Click Browse SDC Service Models and search for the service to instantiate.
The view show only service models in the DISTRIBUTED state.
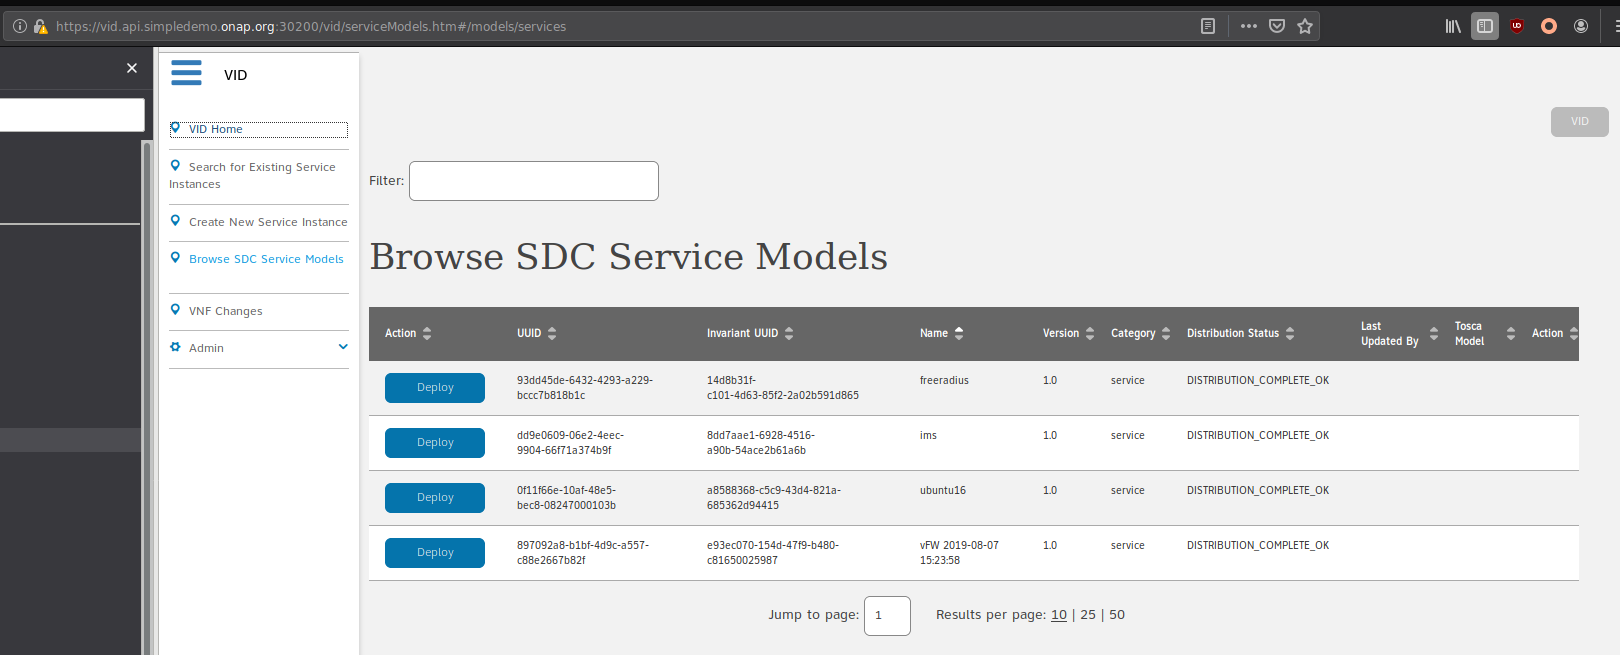
Select a service and click Deploy.
A dialog box displays.
Complete the fields indicated by the red star and click Confirm.
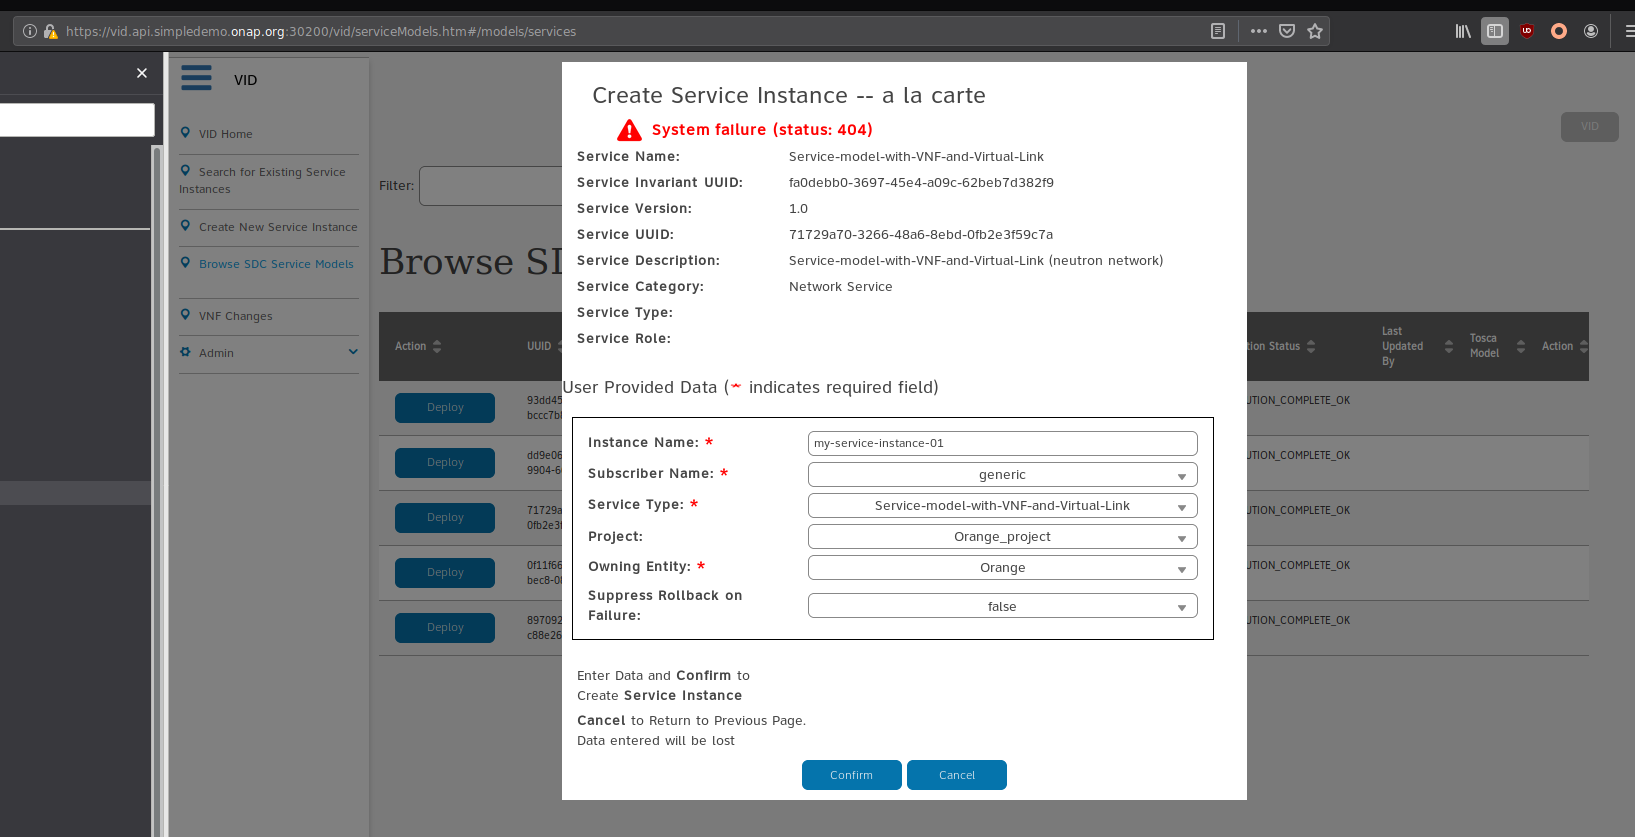
A status box appears that shows the ONAP SO instantiation progress as well as any messages associated with the process.
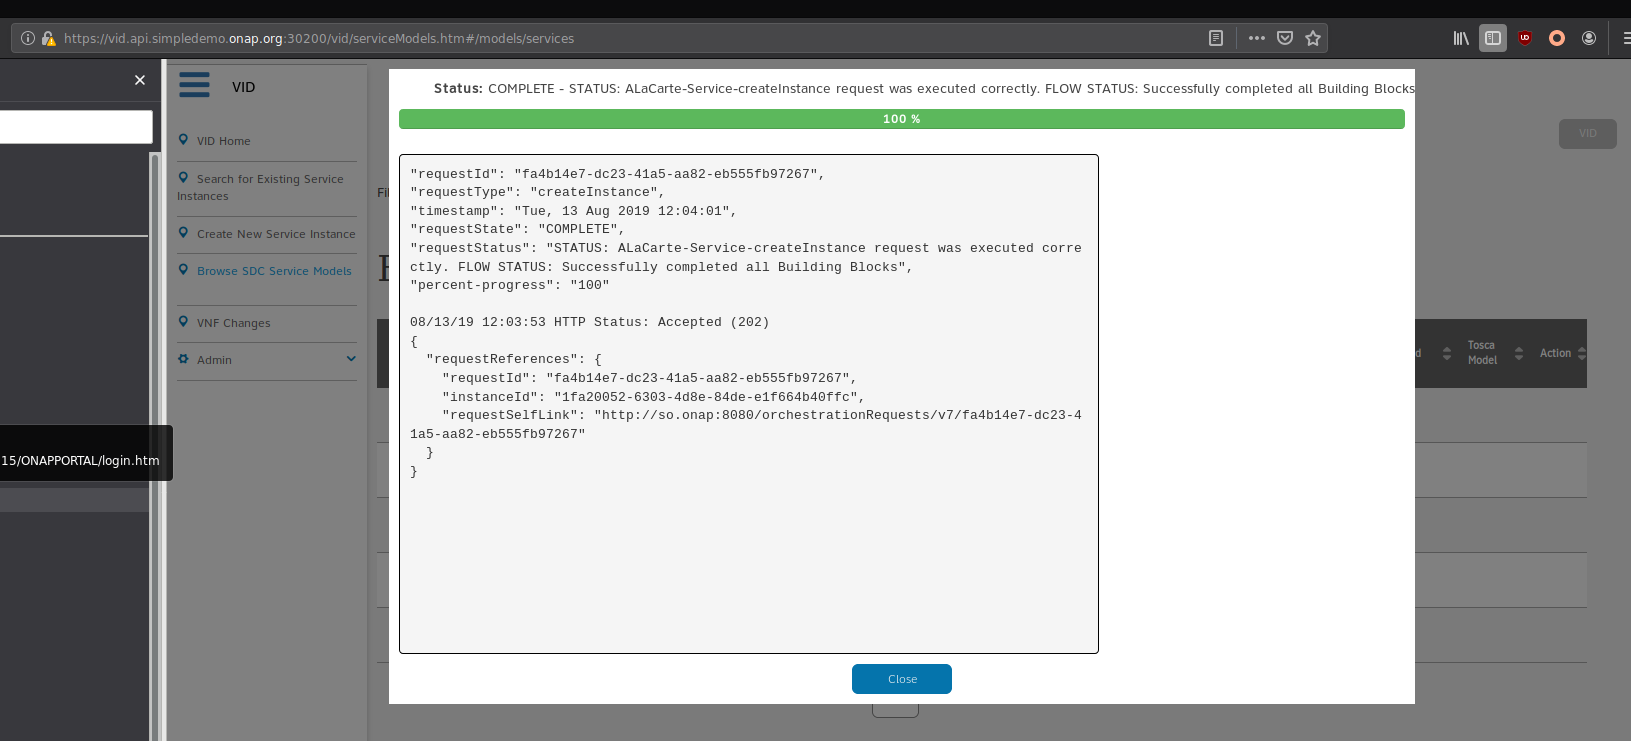
A Service object is created in ONAP.
Click Close and next screen should appear. It will allow to declare VNF(s) and Network(s) that are part of the service model composition.
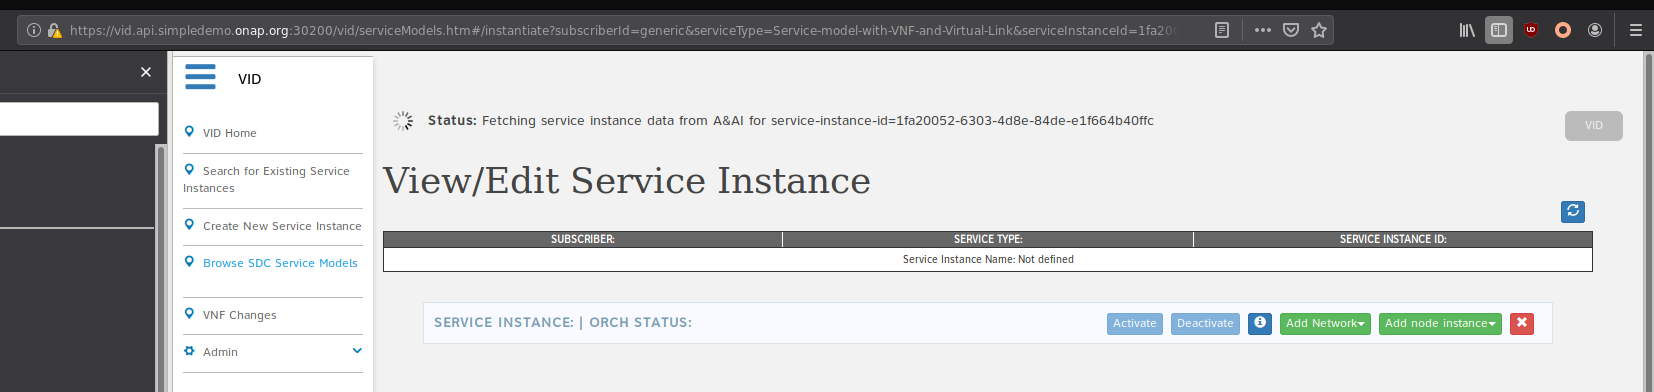
Instantiate a VNF
From previous screen, it is possible to declare a VNF: click on “Add node instance” and select the VNF you want to instantiate in the list
The following screen should appear:
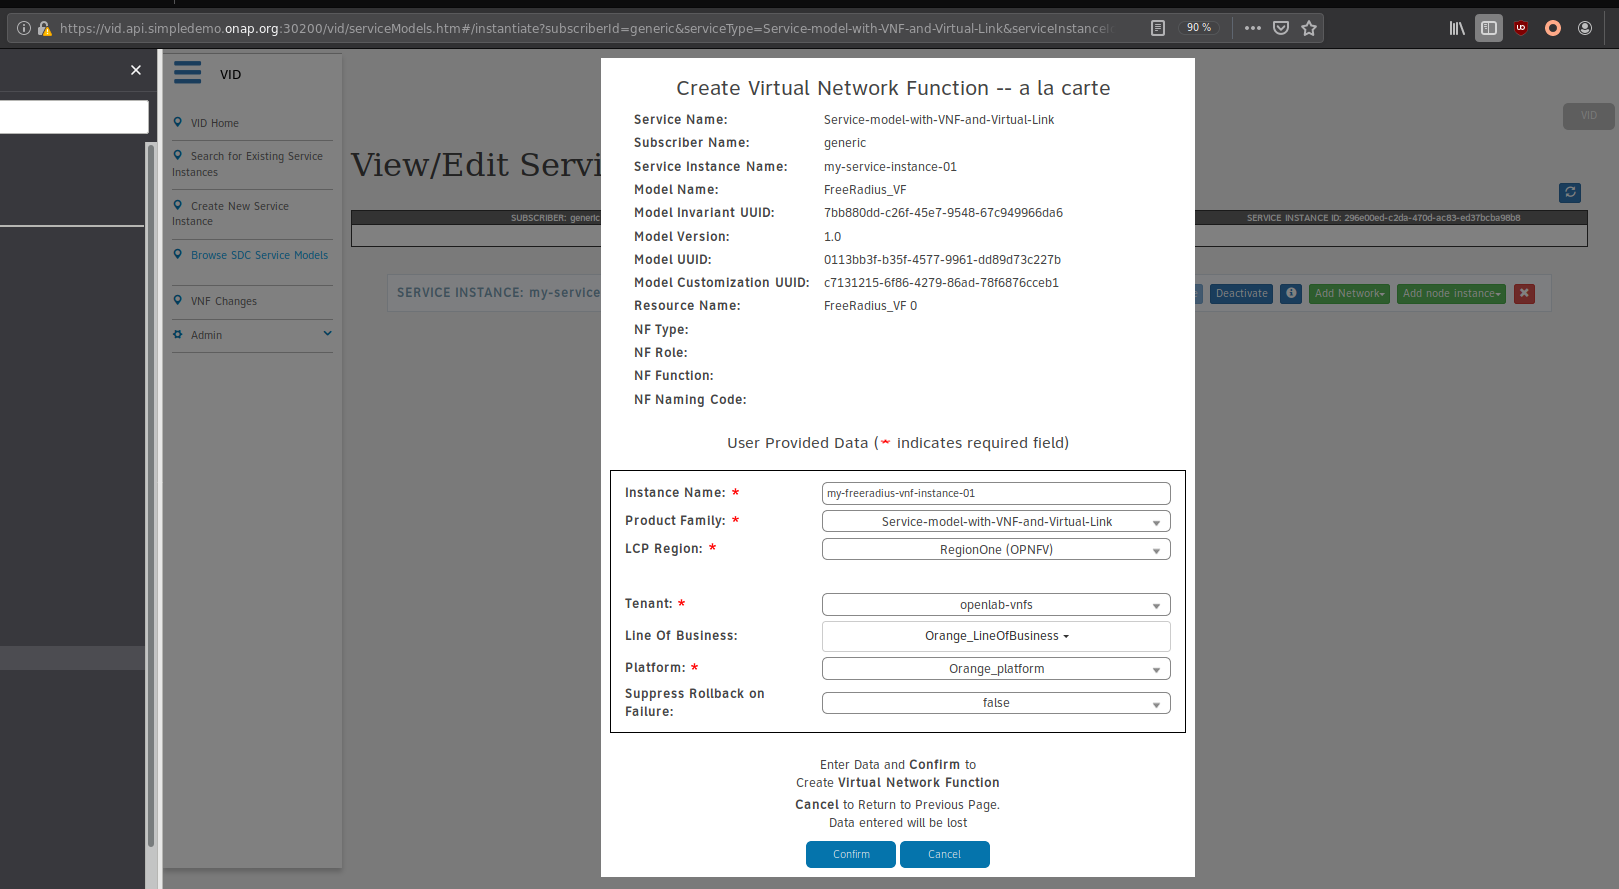
Complete the fields indicated by the red star and click Confirm.
A VNF object will be declared in ONAP.
Once, ONAP SO process is finished, click on close button.
The following screen then should appear:
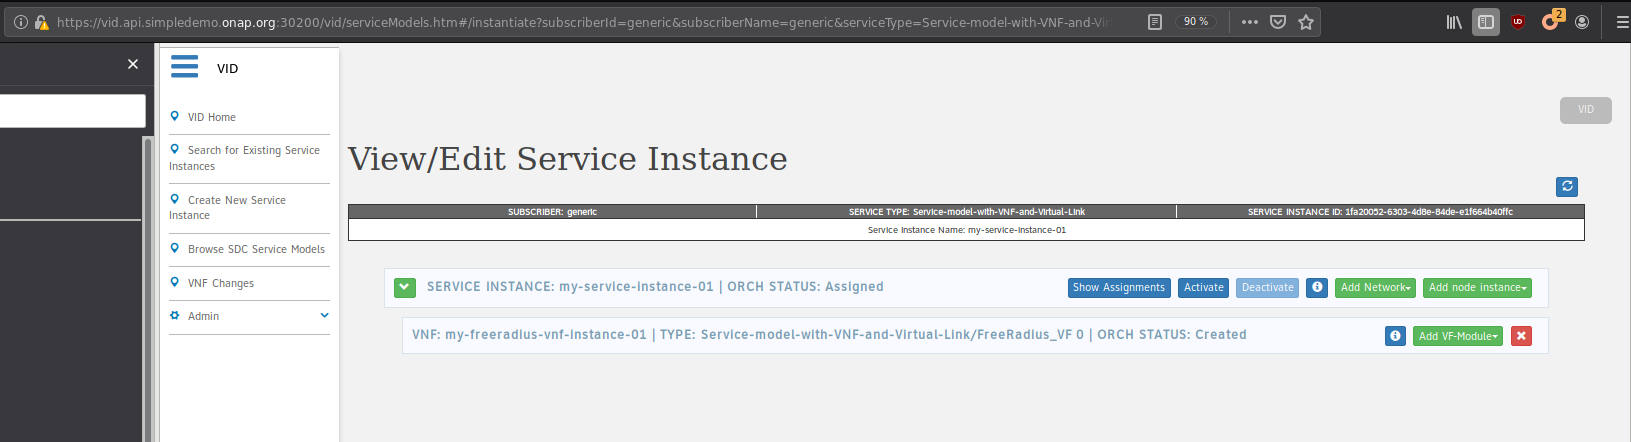
Warning: a this step, no VNF instance (e.g. VM) is created on the Cloud Platform.
Click on “i” blue button to obtain VNF instance display information.
From this screen, it will be possible to get:
the service instance id value
the VNF Type value
Those information will be necessary for the “SDNC preload” step to instantiate the VF module
Close that screen
Instantiate VF Module
It is now possible to declare a VF Module: click on “Add VF-Module” and select the VF-module you want to instantiate in the list
The following screen should appear:
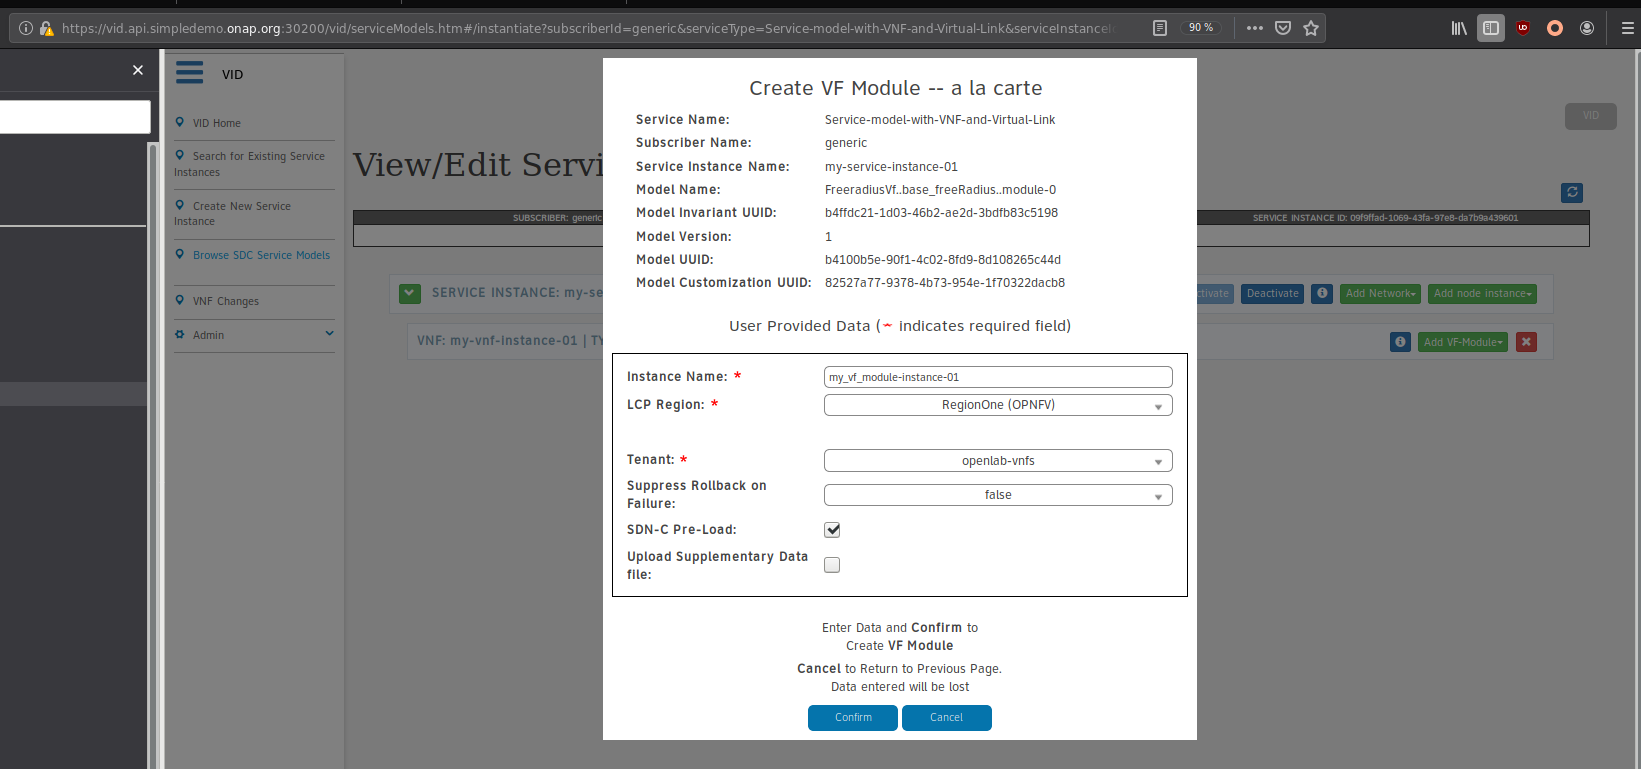
From this screen, it will be possible to get:
“Model Name” value
At this step, with this “A-La-Carte” method, it is necessary to declare some information in ONAP SDNC.
SDNC needs to be aware about the VNF before trying to use ONAP SO to instantiate the VF-module.
This group of data is usually called “SDNC preload” and will contain:
vf-module instance Name
vnf instance Name
service instance id
the list of vnf parameters with values, when not using the default values
Note
Get all the required vnf-parameters values as listed in HEAT package and populate all the key-values in an example SDNC preload curl command to run
Some of the vnf-parameters in SDNC preload are related to openstack. Follow the below steps on openstack to get the values and update those values in SDNC preload template accordingly.
download the image from cloud images (ubuntu-14.04 as per HEAT env) and create an image
create the flavor with m1.medium (suggested as per HEAT env)
create OAM_NETWORK ID & OAM_SUBNET ID (use subnet range from base_vfw.env file)
execute openstack security group rule to open all ports for onap
Here is an example of SDNC preload for VNF, using “curl” tool to push those data using SDNC Rest API:
curl -k -X POST \
https://sdnc.api.simpledemo.onap.org:30267/restconf/operations/VNF-API:preload-vnf-topology-operation \
-H 'Accept: application/json' \
-H 'Authorization: Basic YWRtaW46S3A4Yko0U1hzek0wV1hsaGFrM2VIbGNzZTJnQXc4NHZhb0dHbUp2VXkyVQ==' \
-H 'Content-Type: application/json' \
-H 'X-FromAppId: API client' \
-H 'X-TransactionId: 0a3f6713-ba96-4971-a6f8-c2da85a3176e' \
-H 'cache-control: no-cache' \
-d '{
    "input": {
        "request-information": {
            "notification-url": "onap.org",
            "order-number": "1",
            "order-version": "1",
            "request-action": "PreloadVNFRequest",
            "request-id": "test"
        },
        "sdnc-request-header": {
            "svc-action": "reserve",
            "svc-notification-url": "http:\/\/onap.org:8080\/adapters\/rest\/SDNCNotify",
            "svc-request-id": "test"
        },
        "vnf-topology-information": {
            "vnf-assignments": {
                "availability-zones": [],
                "vnf-networks": [],
                "vnf-vms": []
            },
            "vnf-parameters": [
                {
                    "vnf-parameter-name": "oam_net_id",
                    "vnf-parameter-value": "oam_network_tXWW"
                }
            ],
            "vnf-topology-identifier": {
                "generic-vnf-name": "my-vnf-instance-01",
                "generic-vnf-type": "Service-model-with-VNF-and-Virtual-Link/FreeRadius_VF 0",
                "service-type": "09f9ffad-1069-43fa-97e8-da7b9a439601",
                "vnf-name": "my_vf_module-instance-01",
                "vnf-type": "FreeradiusVf..base_freeRadius..module-0"
            }
        }
    }
}'
Data mapping between ONAP SDNC terminology and ONAP SO
“generic-vnf-name” value must be equal to the VNF instance name value (see VNF instance detail screen)
“generic-vnf-type” value must be equal to VNF Type value (see VNF instance detail screen)
“service-type” value must be equal to the service instance id value (see VNF instance detail screen)
“vnf-name” value must be equal to the VF module instance name value
“vnf-type” value must be equal to the “Model Name” value (see create VF module screen)
If there is a need for an instance specific value of a VNF parameter (for example : an OAM network id value, specific to this VNF instance), the “vnf-parameters” must be completed with a list of name/value.
Once the “SDNC preload” is completed, send it to SDNC using any Rest API Tool.
Then, continue on VID and complete the fields indicated by the red star and click “Confirm”.
Warning : be very careful to use exactly the same VF module instance name on this screen and in the “SDNC preload”
Wait for success and close the popup screen.
The following screen should appear:
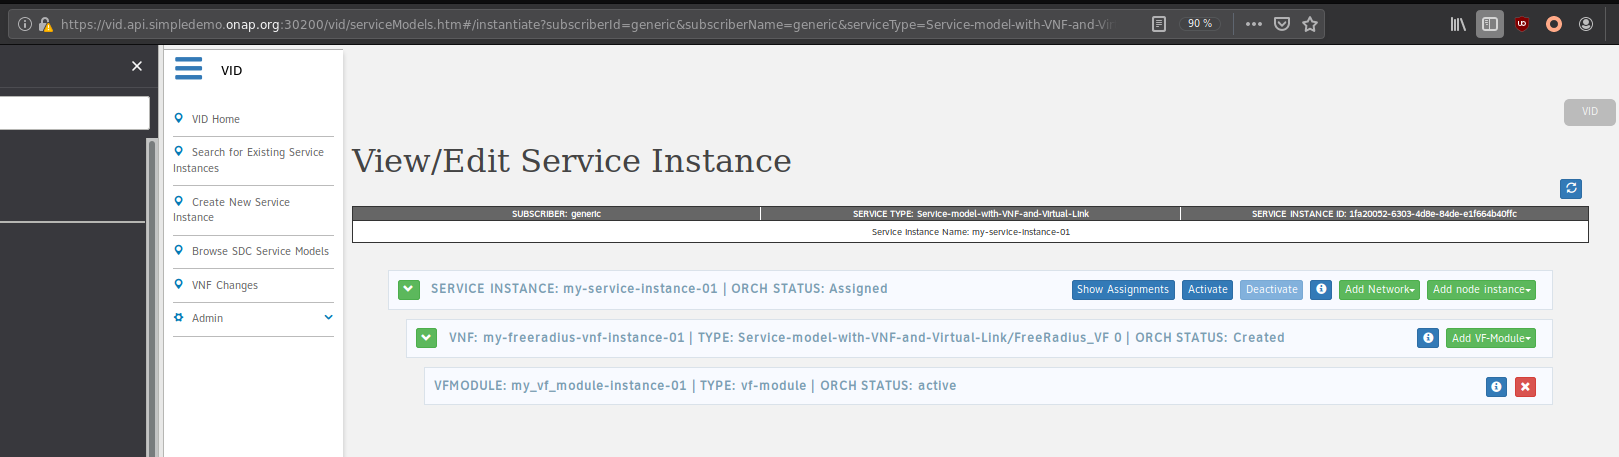
At that point, the VNF is now instantiated in the cloud platform.
Instantiate Network
Instantiating a network is quite similar to vf-module instantiation (there is also the need for a “SDNC preload”)
Click on “Add Network” and select the Network you want to instantiate in the list
The following screen should appear:
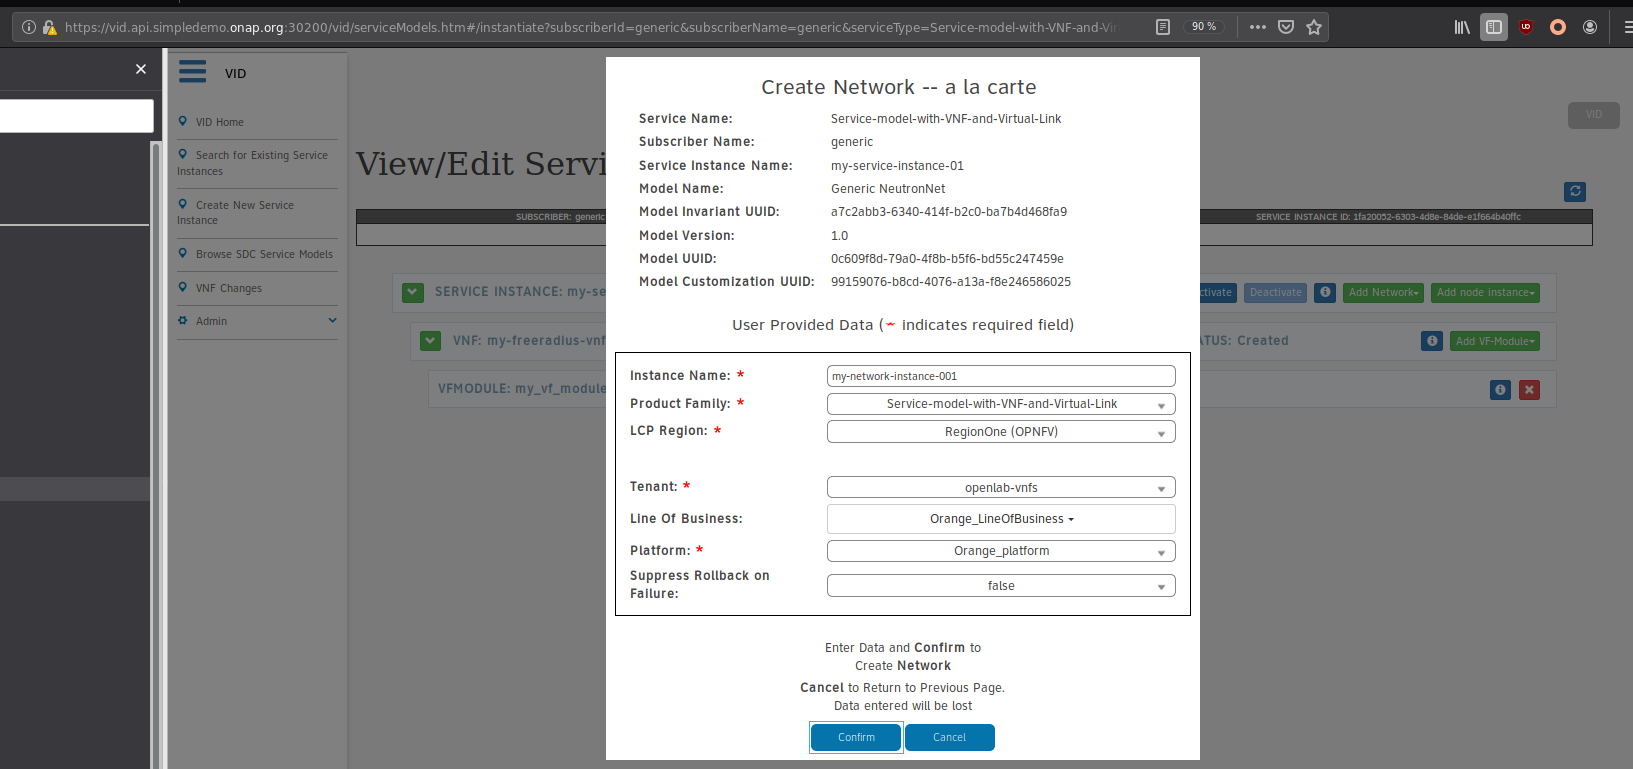
Prepare the “SDNC preload” with:
“network-role”: provide any value,
“network-technology”: use “neutron” as this example will instantiate a network using openstack neutron application
“service-type”: value must be equal to “Service Name” (=service model name) displayed on VID screen
“network-name”: value must be equal to the desired network instance name,
“network-type”: value must be equal to “Model Name””Generic NeutronNet” displayed on VID screen
In addition:
in “provider-network-information” section, it is possible to indicate some network characteristics
it is possible to add a section about “subnets”
Here after, an “SDNC preload” example that can be use for Network instantiation.
curl -k -X POST \
https://sdnc.api.simpledemo.onap.org:30267/restconf/operations/VNF-API:preload-network-topology-operation \
-H 'Accept: application/json' \
-H 'Authorization: Basic YWRtaW46S3A4Yko0U1hzek0wV1hsaGFrM2VIbGNzZTJnQXc4NHZhb0dHbUp2VXkyVQ==' \
-H 'Content-Type: application/json' \
-H 'X-FromAppId: API client' \
-H 'X-TransactionId: 0a3f6713-ba96-4971-a6f8-c2da85a3176e' \
-H 'cache-control: no-cache' \
-d '{
"input": {
    "request-information": {
    "request-id": "postman001",
    "notification-url": "http://so.onap.org",
    "order-number": "postman001",
    "request-sub-action": "SUPP",
    "request-action": "PreloadNetworkRequest",
    "source": "postman",
    "order-version": "1.0"
    },
    "network-topology-information": {
    "network-policy": [],
    "route-table-reference": [],
    "vpn-bindings": [],
    "network-topology-identifier": {
        "network-role": "integration_test_net",
        "network-technology": "neutron",
        "service-type": "Service-model-with-VNF-and-Virtual-Link",
        "network-name": "my-network-instance-001",
        "network-type": "Generic NeutronNet"
    },
    "provider-network-information": {
        "is-external-network": "false",
        "is-provider-network": "false",
        "is-shared-network": "false"
    },
    "subnets": [
        {
        "subnet-name": "my-sub_network-instance-001",
        "subnet-role": "OAM",
        "start-address": "192.168.90.0",
        "cidr-mask": "24",
        "ip-version": "4",
        "dhcp-enabled": "Y",
        "dhcp-start-address": "",
        "dhcp-end-address": "",
        "gateway-address": "192.168.90.1",
        "host-routes":[]
        }
            ]
    },
    "sdnc-request-header": {
    "svc-action": "reserve",
    "svc-notification-url": "http://so.onap.org",
    "svc-request-id": "postman001"
    }
}
}
'
Once the “SDNC preload” is completed, send it to SDNC using any Rest API Tool.
Then, continue on VID and complete the fields indicated by the red star and click “Confirm”.
Warning : be very careful to use exactly the same network instance name on this screen and in the “SDNC preload”
Wait for success and close the popup screen.
The following screen should appear:
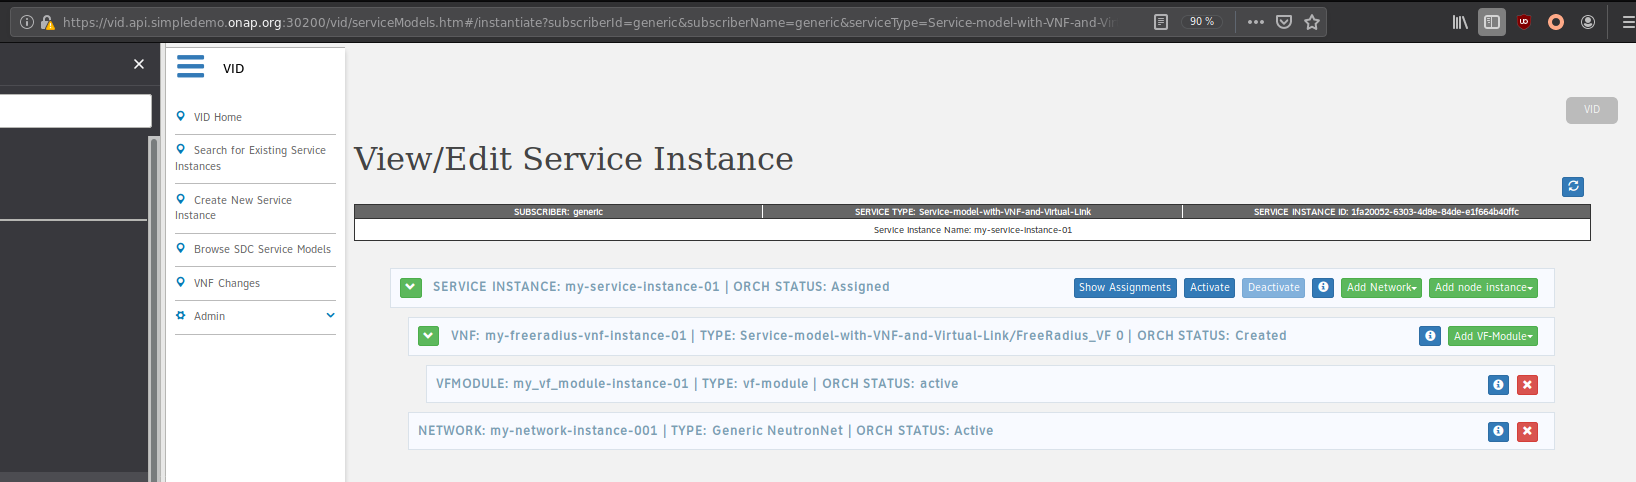
At that point, the Network and subnets are now instantiated in the cloud platform.
Also, all those network information are available in ONAP AAI, under the terminology “l3-network”, with the “neutron-network-id” and the “neutron-subnet-id” provided by the openstack platform.
Deleting Network, VF module, VNF, Service
To delete a service instance using VID, it is necessary to delete objects in the following sequence:
delete VF module(s)
delete VNF instance(s)
delete Network(s)
delete service instance
To proceed those deletion, from VID Home screen
search for existing service instance
edit/view the service instance you want to delete
click on red button with white cross and confirm for each object