CLAMP Policy Participant Smoke Tests
1. Introduction
The Smoke testing of the policy participant is executed in a local CLAMP/Policy environment. The CLAMP-Controlloop interfaces interact with the Policy Framework to perform actions based on the state of the policy participant. The goal of the Smoke tests is the ensure that CLAMP Policy Participant and Policy Framework work together as expected.
2. Setup Guide
This section will show the developer how to set up their environment to start testing in GUI with some instruction on how to carry out the tests. There are a number of prerequisites. Note that this guide is written by a Linux user - although the majority of the steps show will be exactly the same in Windows or other systems.
2.1 Prerequisites
Java 11
Maven 3
Git
Refer to this guide for basic environment setup Setting up dev environment
2.2 Assumptions
You are accessing the policy repositories through gerrit
You are using “git review”.
The following repositories are required for development in this project. These repositories should be present on your machine and you should run “mvn clean install” on all of them so that the packages are present in your .m2 repository.
policy/parent
policy/common
policy/models
policy/clamp
policy/docker
policy/gui
policy/api
In this setup guide, we will be setting up all the components technically required for a working convenient dev environment.
2.3 Setting up the components
2.3.1 MariaDB Setup
We will be using Docker to run our mariadb instance. It will have a total of two databases running in it.
controlloop: the runtime-controlloop db
policyadmin: the policy-api db
The easiest way to do this is to perform a small alteration on an SQL script provided by the clamp backend in the file “runtime/extra/sql/bulkload/create-db.sql”
CREATE DATABASE `controlloop`;
USE `controlloop`;
DROP USER 'policy';
CREATE USER 'policy';
GRANT ALL on controlloop.* to 'policy' identified by 'P01icY' with GRANT OPTION;
CREATE DATABASE `policyadmin`;
USE `policyadmin`;
DROP USER 'policy_user';
CREATE USER 'policy_user';
GRANT ALL on controlloop.* to 'policy_user' identified by 'policy_user' with GRANT OPTION;
FLUSH PRIVILEGES;
Once this has been done, we can run the bash script provided here: “runtime/extra/bin-for-dev/start-db.sh”
./start-db.sh
This will setup the two databases needed. The database will be exposed locally on port 3306 and will be backed by an anonymous docker volume.
2.3.2 DMAAP Simulator
For convenience, a dmaap simulator has been provided in the policy/models repository. To start the simulator, you can do the following: 1. Navigate to /models-sim/policy-models-simulators in the policy/models repository. 2. Add a configuration file to src/test/resources with the following contents:
{
   "dmaapProvider":{
      "name":"DMaaP simulator",
      "topicSweepSec":900
   },
   "restServers":[
      {
         "name":"DMaaP simulator",
         "providerClass":"org.onap.policy.models.sim.dmaap.rest.DmaapSimRestControllerV1",
         "host":"localhost",
         "port":3904,
         "https":false
      }
   ]
}
You can then start dmaap with:
mvn exec:java -Dexec.mainClass=org.onap.policy.models.simulators.Main -Dexec.args="src/test/resources/YOUR_CONF_FILE.json"
At this stage the dmaap simulator should be running on your local machine on port 3904.
2.3.3 Policy API
In the policy-api repo, you should find the file “src/main/resources/etc/defaultConfig.json”. This file must be altered slightly - as below with the restServerParameters and databaseProviderParameters shown. Note how the database parameters match-up with what you setup in Mariadb:
{
    "restServerParameters": {
        "host": "0.0.0.0",
        "port": 6970,
        "userName": "healthcheck",
        "password": "zb!XztG34",
        "prometheus": true,
        "https": false,
        "aaf": false
    },
    "databaseProviderParameters": {
        "name": "PolicyProviderParameterGroup",
        "implementation": "org.onap.policy.models.provider.impl.DatabasePolicyModelsProviderImpl",
        "databaseDriver": "org.mariadb.jdbc.Driver",
        "databaseUrl": "jdbc:mariadb://mariadb:3306/policyadmin",
        "databaseUser": "policy_user",
        "databasePassword": "policy_user",
        "persistenceUnit": "PolicyMariaDb"
    },
}
Next, navigate to the “/main” directory. You can then run the following command to start the policy api:
mvn exec:java -Dexec.mainClass=org.onap.policy.api.main.startstop.Main -Dexec.args=" -c ../packages/policy-api-tarball/src/main/resources/etc/defaultConfig.json"
2.3.4 Policy PAP
In the policy-pap repo, you should find the file ‘main/src/test/resources/parameters/PapConfigParameters.json’. This file may need to be altered slightly as below:
{
    "name": "PapGroup",
    "restServerParameters": {
        "host": "0.0.0.0",
        "port": 6968,
        "userName": "healthcheck",
        "password": "zb!XztG34",
        "https": false
    },
    "pdpParameters": {
        "heartBeatMs": 60000,
        "updateParameters": {
            "maxRetryCount": 1,
            "maxWaitMs": 30000
        },
        "stateChangeParameters": {
            "maxRetryCount": 1,
            "maxWaitMs": 30000
        }
    },
    "databaseProviderParameters": {
        "name": "PolicyProviderParameterGroup",
        "implementation": "org.onap.policy.models.provider.impl.DatabasePolicyModelsProviderImpl",
        "databaseDriver": "org.mariadb.jdbc.Driver",
        "databaseUrl": "jdbc:mariadb://localhost:3306/policyadmin",
        "databaseUser": "policy_user",
        "databasePassword": "policy_user",
        "persistenceUnit": "PolicyMariaDb"
    },
    "topicParameterGroup": {
        "topicSources" : [{
            "topic" : "POLICY-PDP-PAP",
            "servers" : [ "localhost:3904" ],
            "topicCommInfrastructure" : "dmaap"
        }],
        "topicSinks" : [{
            "topic" : "POLICY-PDP-PAP",
            "servers" : [ "localhost:3904" ],
            "topicCommInfrastructure" : "dmaap"
        },{
            "topic" : "POLICY-NOTIFICATION",
            "servers" : [ "localhost:3904" ],
            "topicCommInfrastructure" : "dmaap"
        }]
    },
    "healthCheckRestClientParameters":[{
        "clientName": "api",
        "hostname": "policy-api",
        "port": 6968,
        "userName": "healthcheck",
        "password": "zb!XztG34",
        "useHttps": false,
        "basePath": "policy/api/v1/healthcheck"
    },
    {
        "clientName": "distribution",
        "hostname": "policy-distribution",
        "port": 6970,
        "userName": "healthcheck",
        "password": "zb!XztG34",
        "useHttps": false,
        "basePath": "healthcheck"
    }]
}
Next, navigate to the “/main” directory. You can then run the following command to start the policy pap
mvn -q -e clean compile exec:java -Dexec.mainClass="org.onap.policy.pap.main.startstop.Main" -Dexec.args="-c /src/test/resources/parameters/PapConfigParameters.json"
2.3.5 Controlloop Runtime
To start the controlloop runtime we need to go the “runtime-controlloop” directory in the clamp repo. There is a config file that is used, by default, for the controlloop runtime. That config file is here: “src/main/resources/application.yaml”. For development in your local environment, it shouldn’t need any adjustment and we can just run the controlloop runtime with:
mvn spring-boot:run
2.3.6 Controlloop Policy Participant
To start the policy participant we need to go to the “participant-impl/participant-impl-policy” directory in the clamp repo. There is a config file under “src/main/resources/config/application.yaml”. For development in your local environment, we will need to adjust this file slightly:
server:
    port: 8082

participant:
  pdpGroup: defaultGroup
  pdpType: apex
  policyApiParameters:
    clientName: api
    hostname: localhost
    port: 6970
    userName: healthcheck
    password: zb!XztG34
    https: true
    allowSelfSignedCerts: true
  policyPapParameters:
    clientName: pap
    hostname: localhost
    port: 6968
    userName: healthcheck
    password: zb!XztG34
    https: true
    allowSelfSignedCerts: true
  intermediaryParameters:
    reportingTimeIntervalMs: 120000
    description: Participant Description
    participantId:
      name: org.onap.PM_Policy
      version: 1.0.0
    participantType:
      name: org.onap.policy.controlloop.PolicyControlLoopParticipant
      version: 2.3.1
    clampControlLoopTopics:
      topicSources:
        -
          topic: POLICY-CLRUNTIME-PARTICIPANT
          servers:
            - ${topicServer:localhost}
          topicCommInfrastructure: dmaap
          fetchTimeout: 15000
      topicSinks:
        -
          topic: POLICY-CLRUNTIME-PARTICIPANT
          servers:
            - ${topicServer:localhost}
          topicCommInfrastructure: dmaap
Navigate to the participant-impl/particpant-impl-policy/main directory. We can then run the policy-participant with the following command:
mvn spring-boot:run -Dspring-boot.run.arguments="--server.port=8082 --topicServer=localhost"
3. Testing Procedure
3.1 Testing Outline
To perform the Smoke testing of the policy-participant we will be verifying the behaviours of the participant when the control loop changes state. The scenarios are:
UNINITIALISED to PASSIVE: participant creates policies and policyTypes specified in the ToscaServiceTemplate using policy-api
PASSIVE to RUNNING: participant deploys created policies specified in the ToscaServiceTemplate
RUNNING to PASSIVE: participant undeploys policies which have been deployed
PASSIVE to UNINITIALISED: participant deletes policies and policyTypes which has been created
3.2 Testing Steps
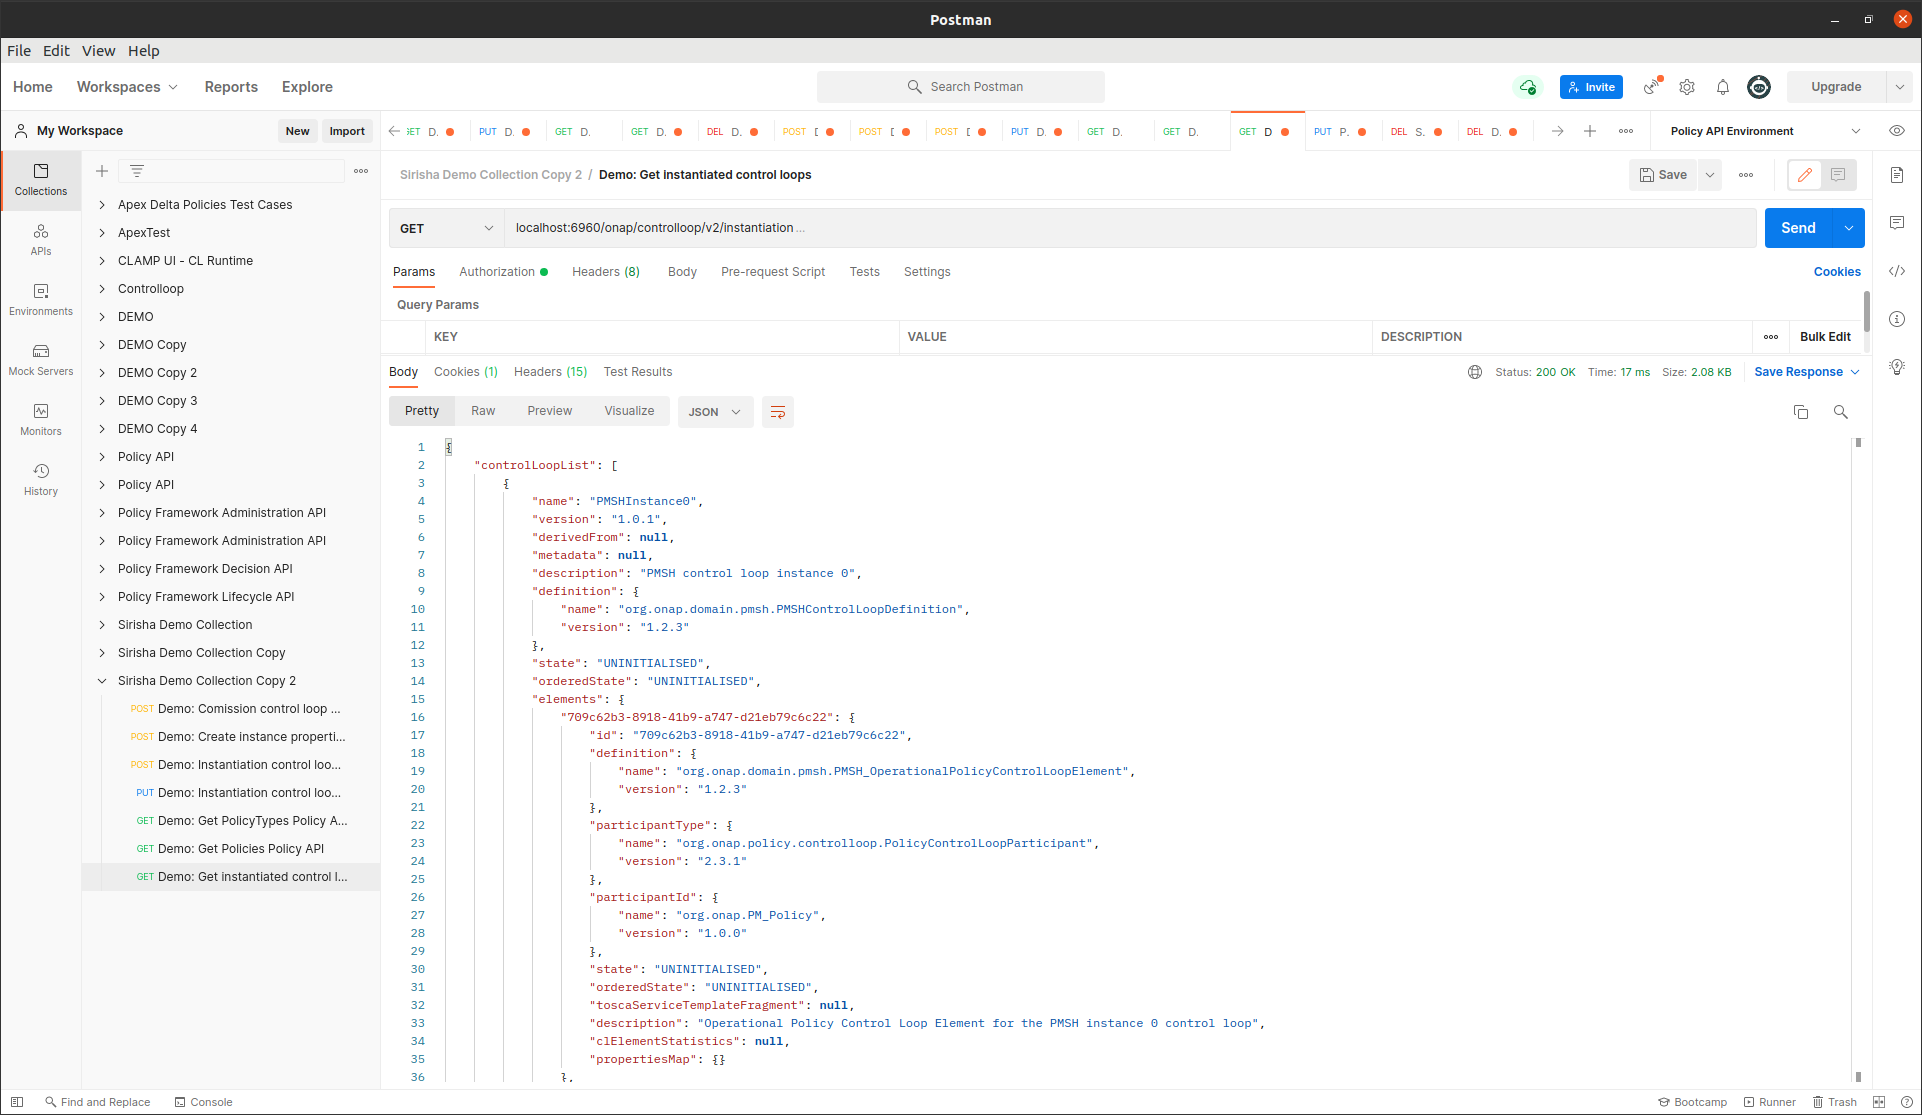
Creation of Controlloop:
A Control Loop is created by commissioning a Tosca template with Control loop definitions and instantiating the Control Loop with the state “UNINITIALISED”. Using postman, commision a TOSCA template and instantiate using the following template:
To verify this, we check that the Controlloop has been created and is in state UNINITIALISED.
Creation of policies and policyTypes:
The Controlloop STATE is changed from UNINITIALISED to PASSIVE using postman:
{
    "orderedState": "PASSIVE",
    "controlLoopIdentifierList": [
        {
            "name": "PMSHInstance0",
            "version": "1.0.1"
        }
    ]
}
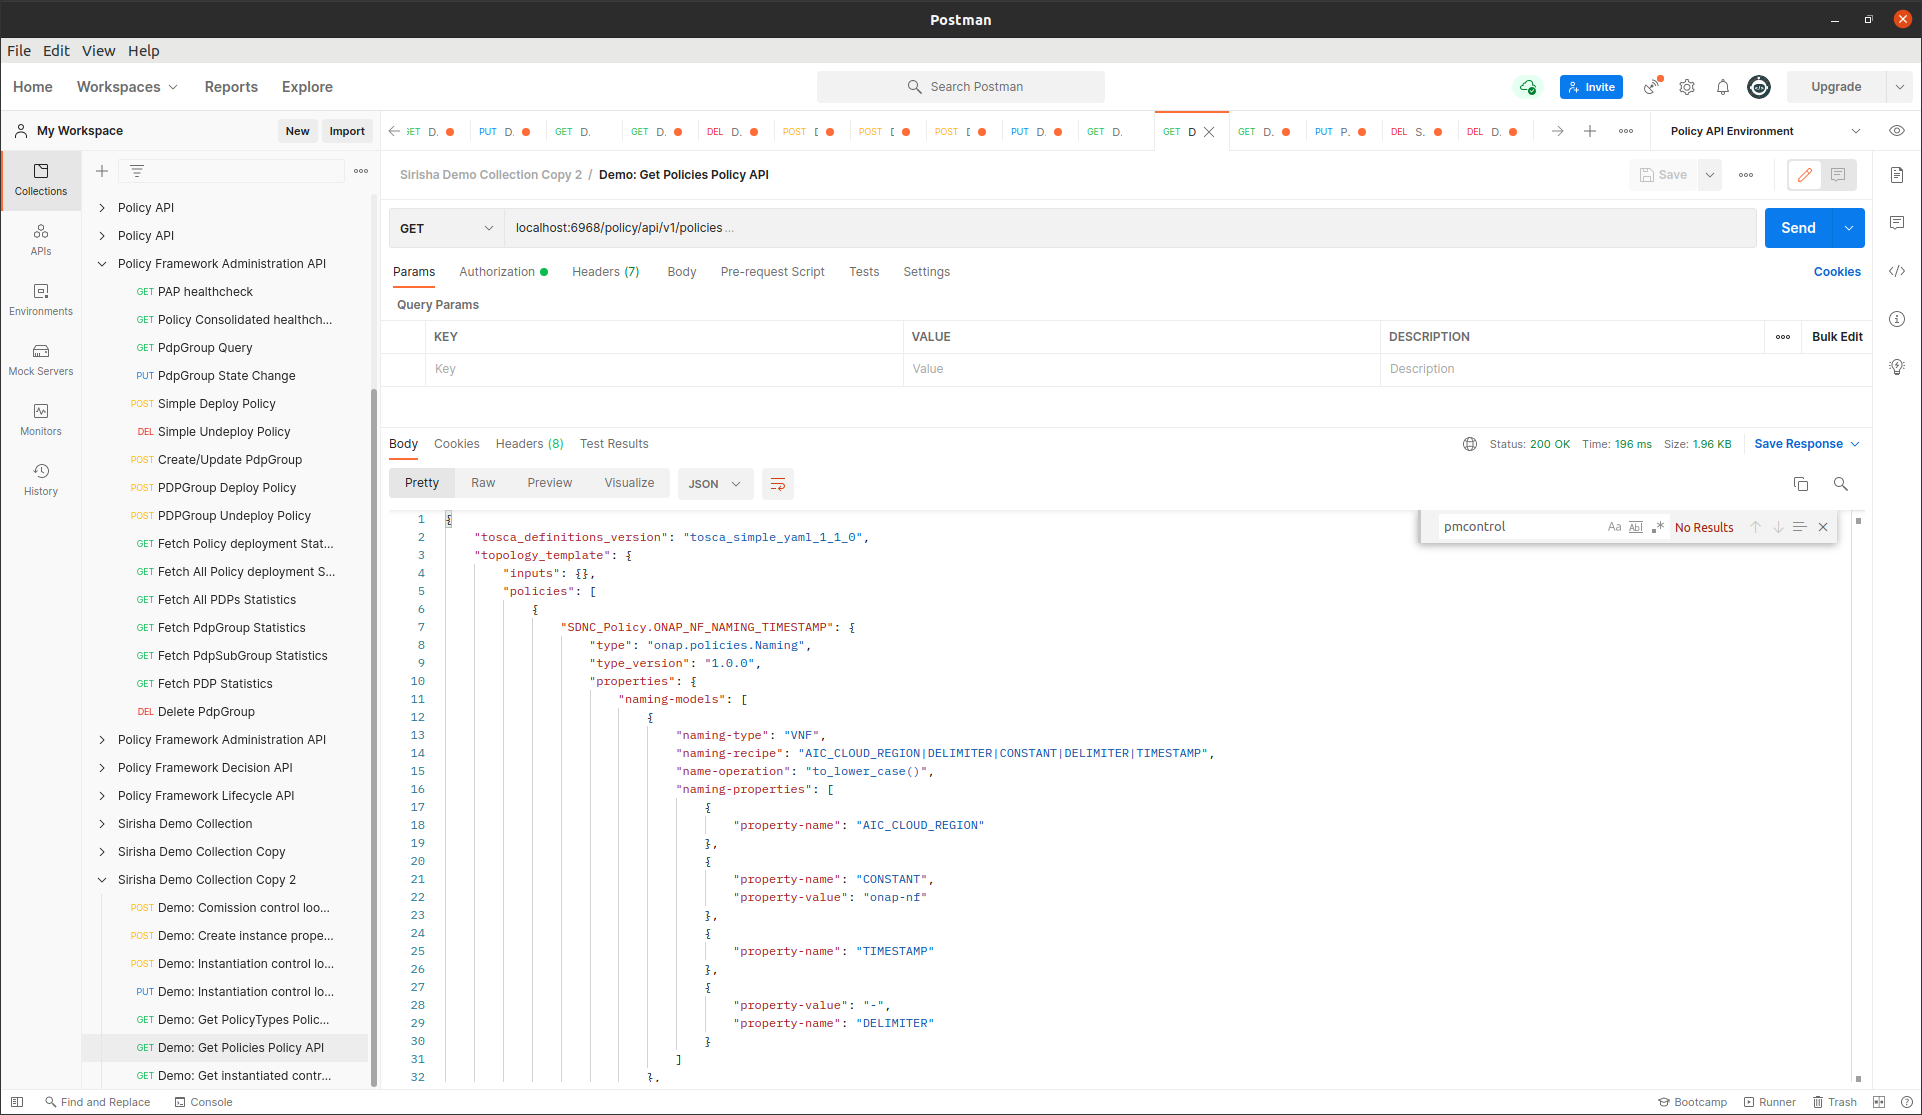
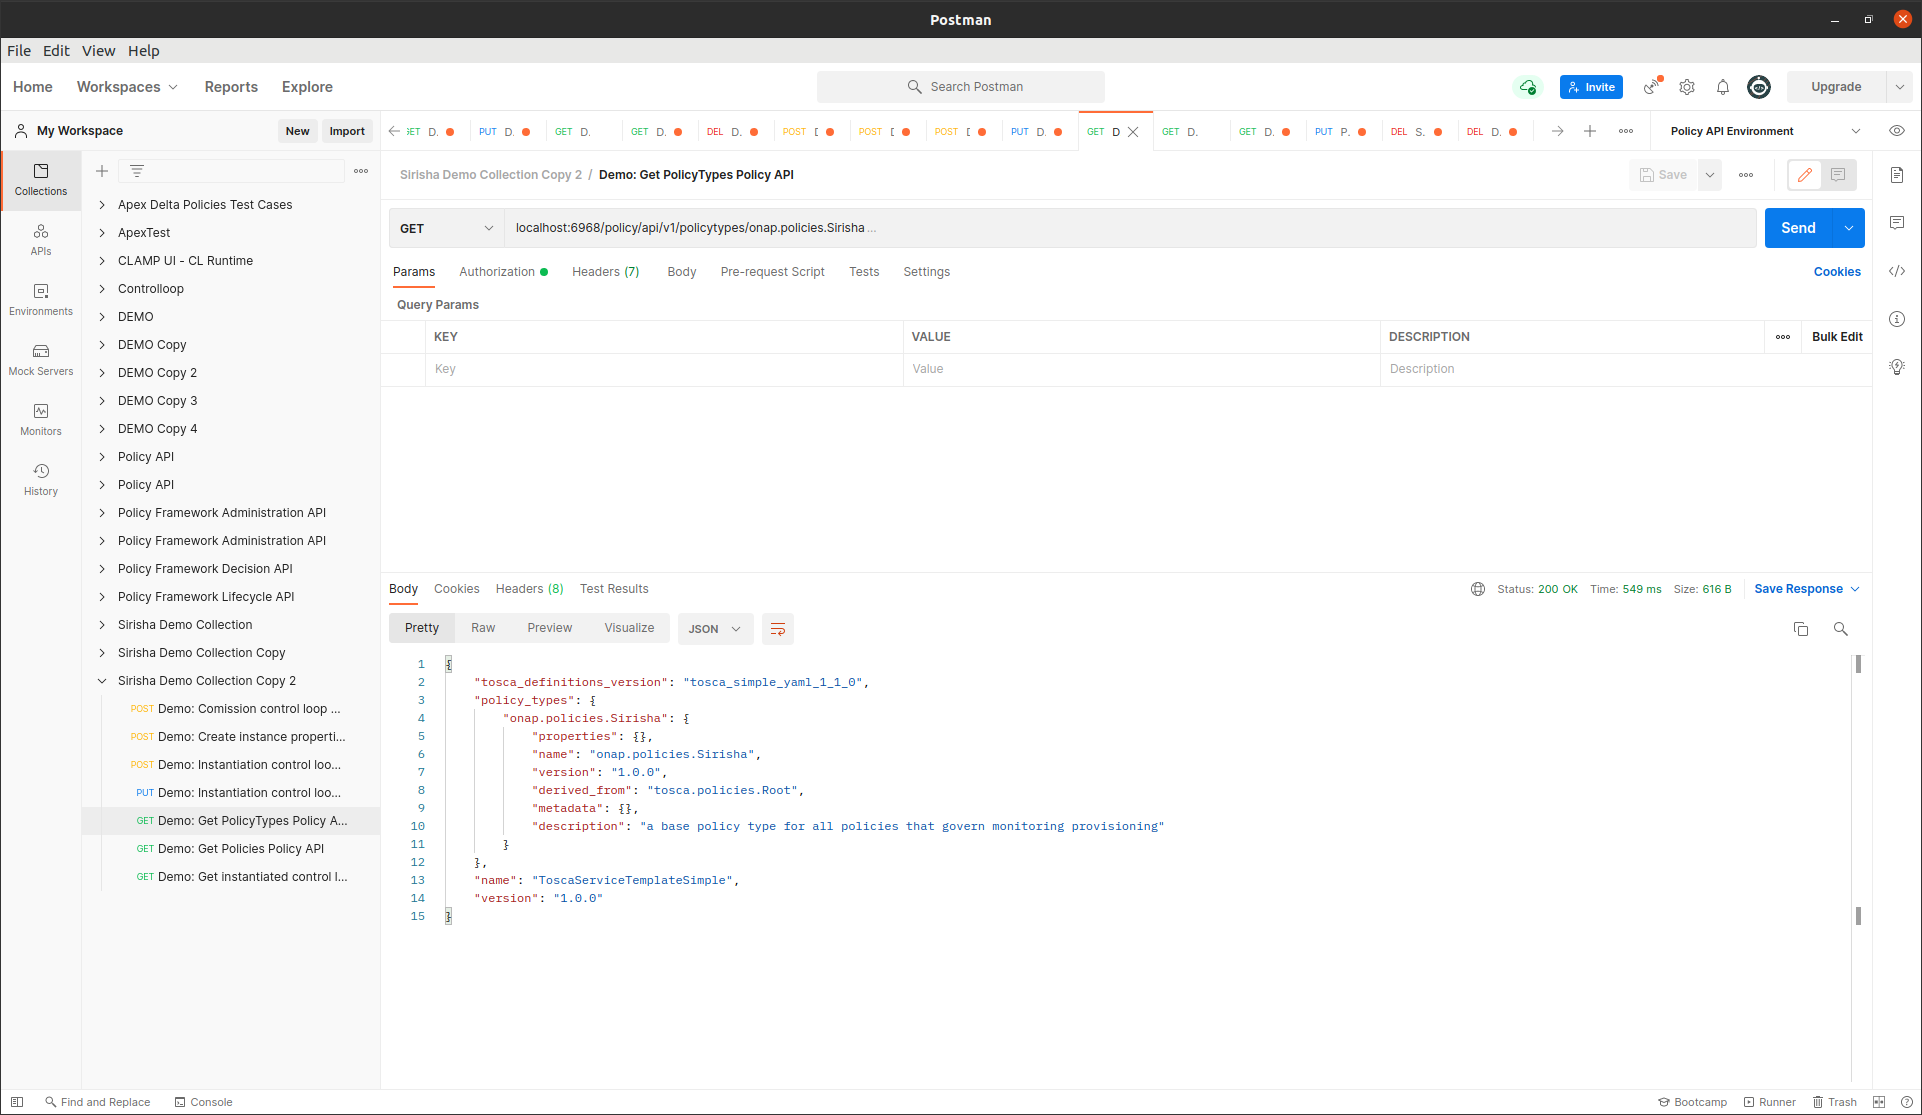
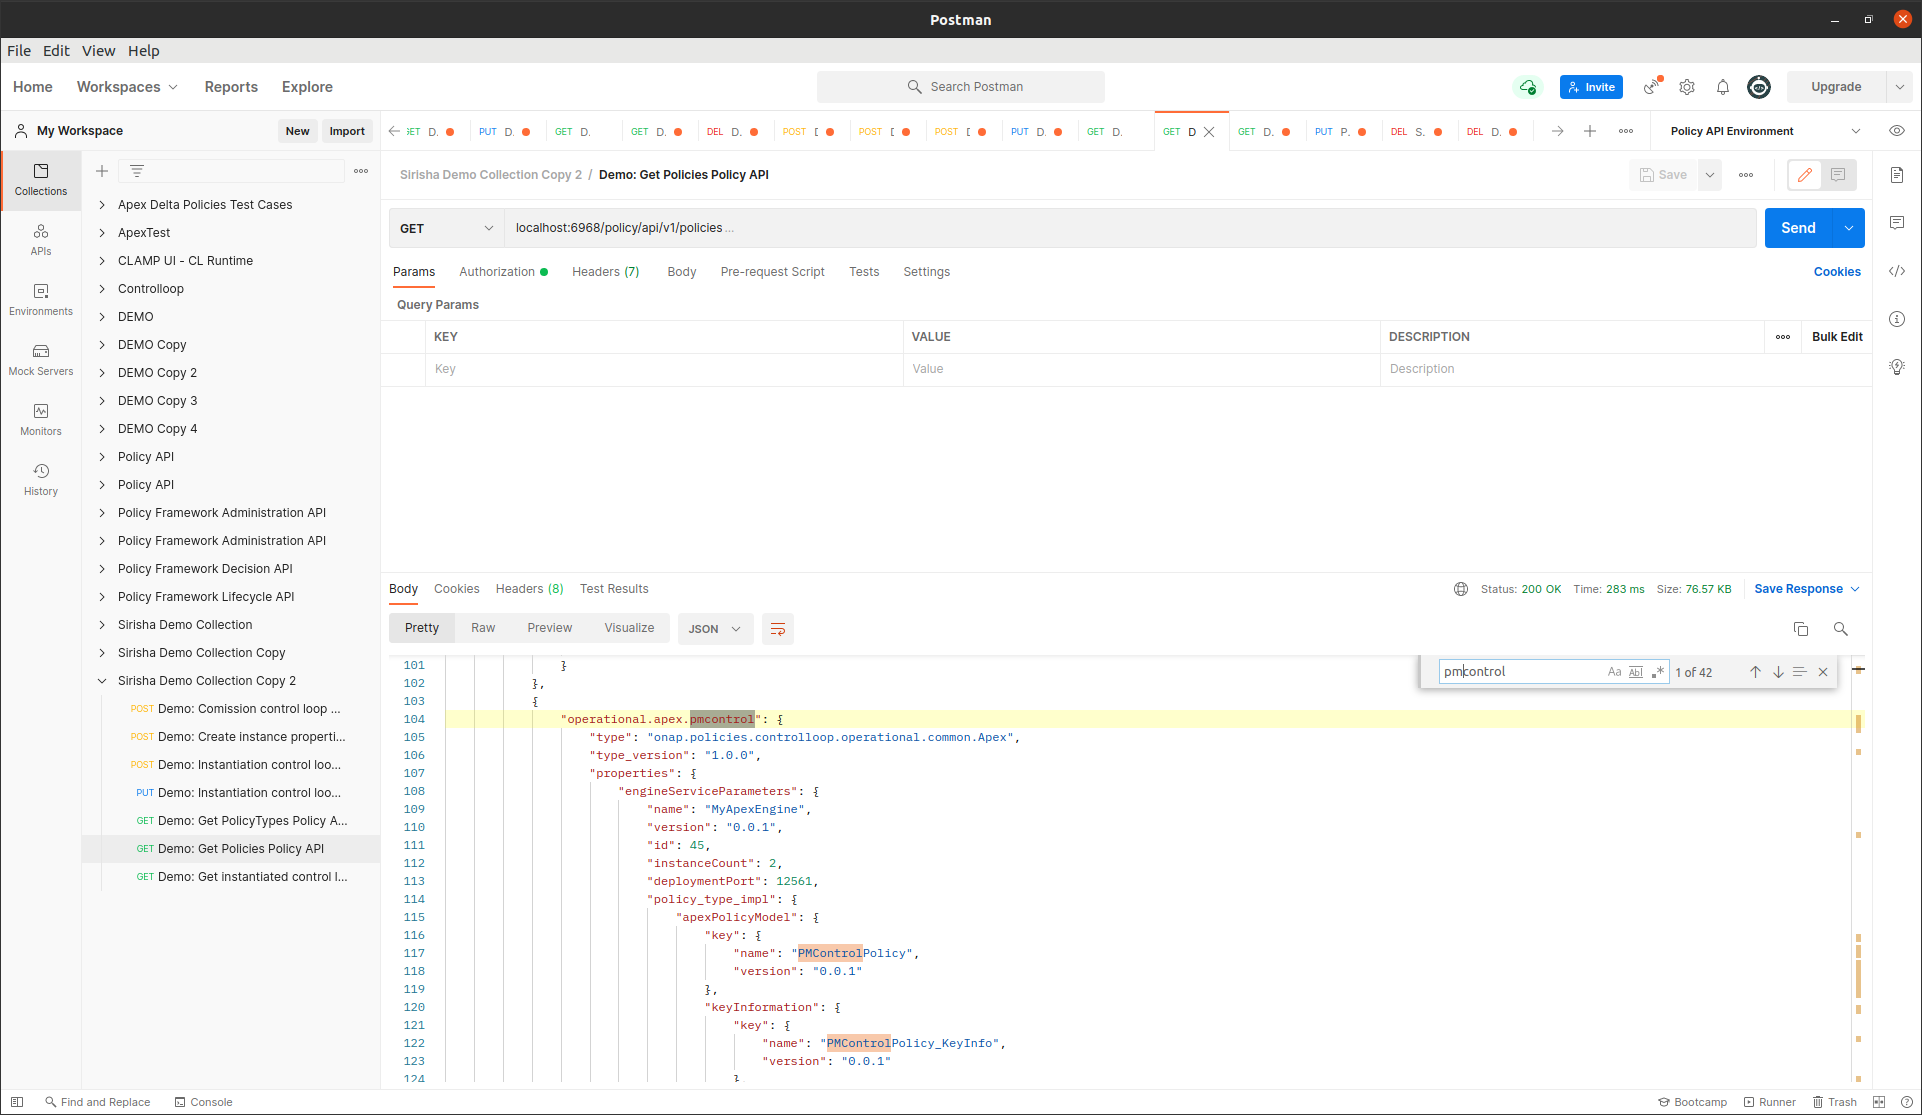
This state change will trigger the creation of policies and policyTypes using the policy-api. To verify this we will check, using policy-api endpoints, that the “Sirisha” policyType, which is specified in the service template, has been created.
We can also check that the pm-control policy has been created.
Deployment of policies:
The Controlloop STATE is changed from PASSIVE to RUNNING using postman:
{
    "orderedState": "RUNNING",
    "controlLoopIdentifierList": [
        {
            "name": "PMSHInstance0",
            "version": "1.0.1"
        }
    ]
}
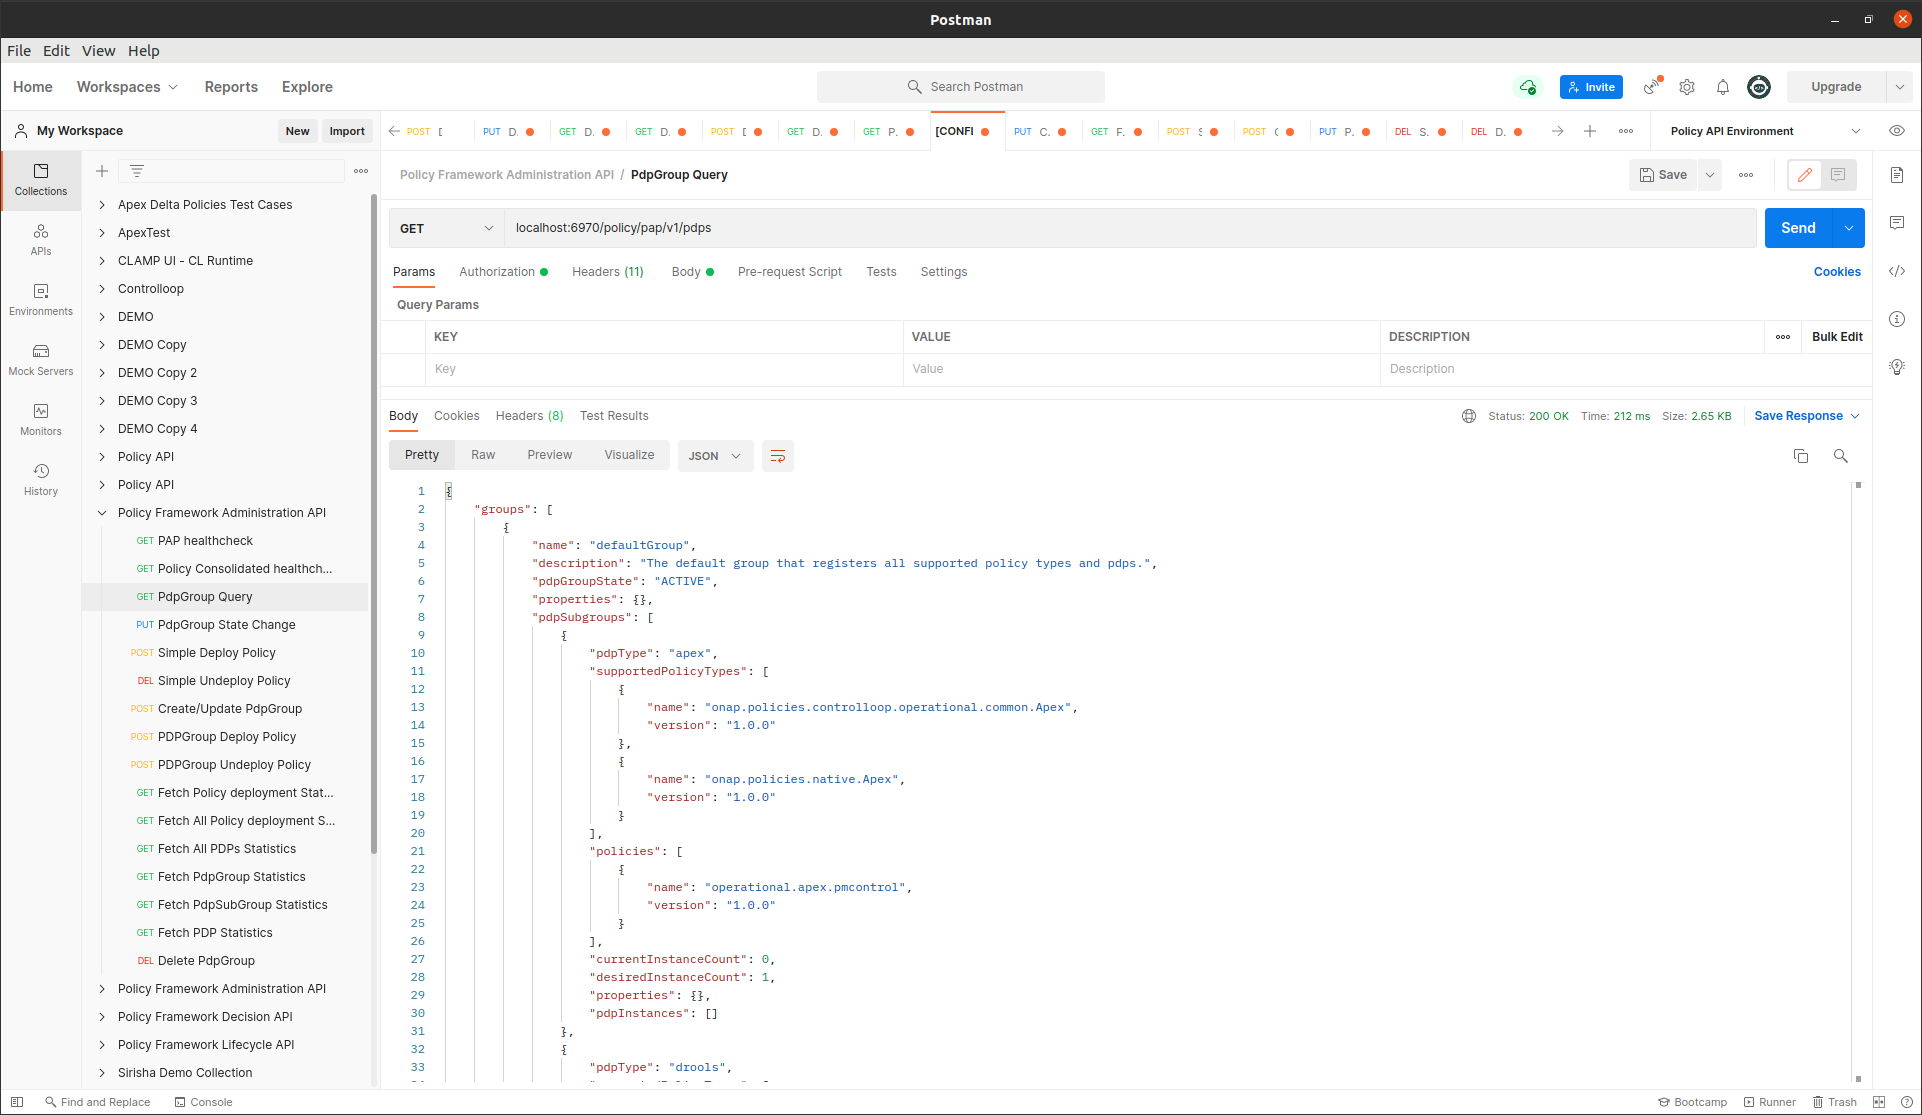
This state change will trigger the deployment of the policies specified in the ToscaServiceTemplate. To verify this, we will check that the apex pmcontrol policy has been deployed to the defaultGroup. We check this using pap:
Undeployment of policies:
The Controlloop STATE is changed from RUNNING to PASSIVE using postman:
{
    "orderedState": "PASSIVE",
    "controlLoopIdentifierList": [
        {
            "name": "PMSHInstance0",
            "version": "1.0.1"
        }
    ]
}
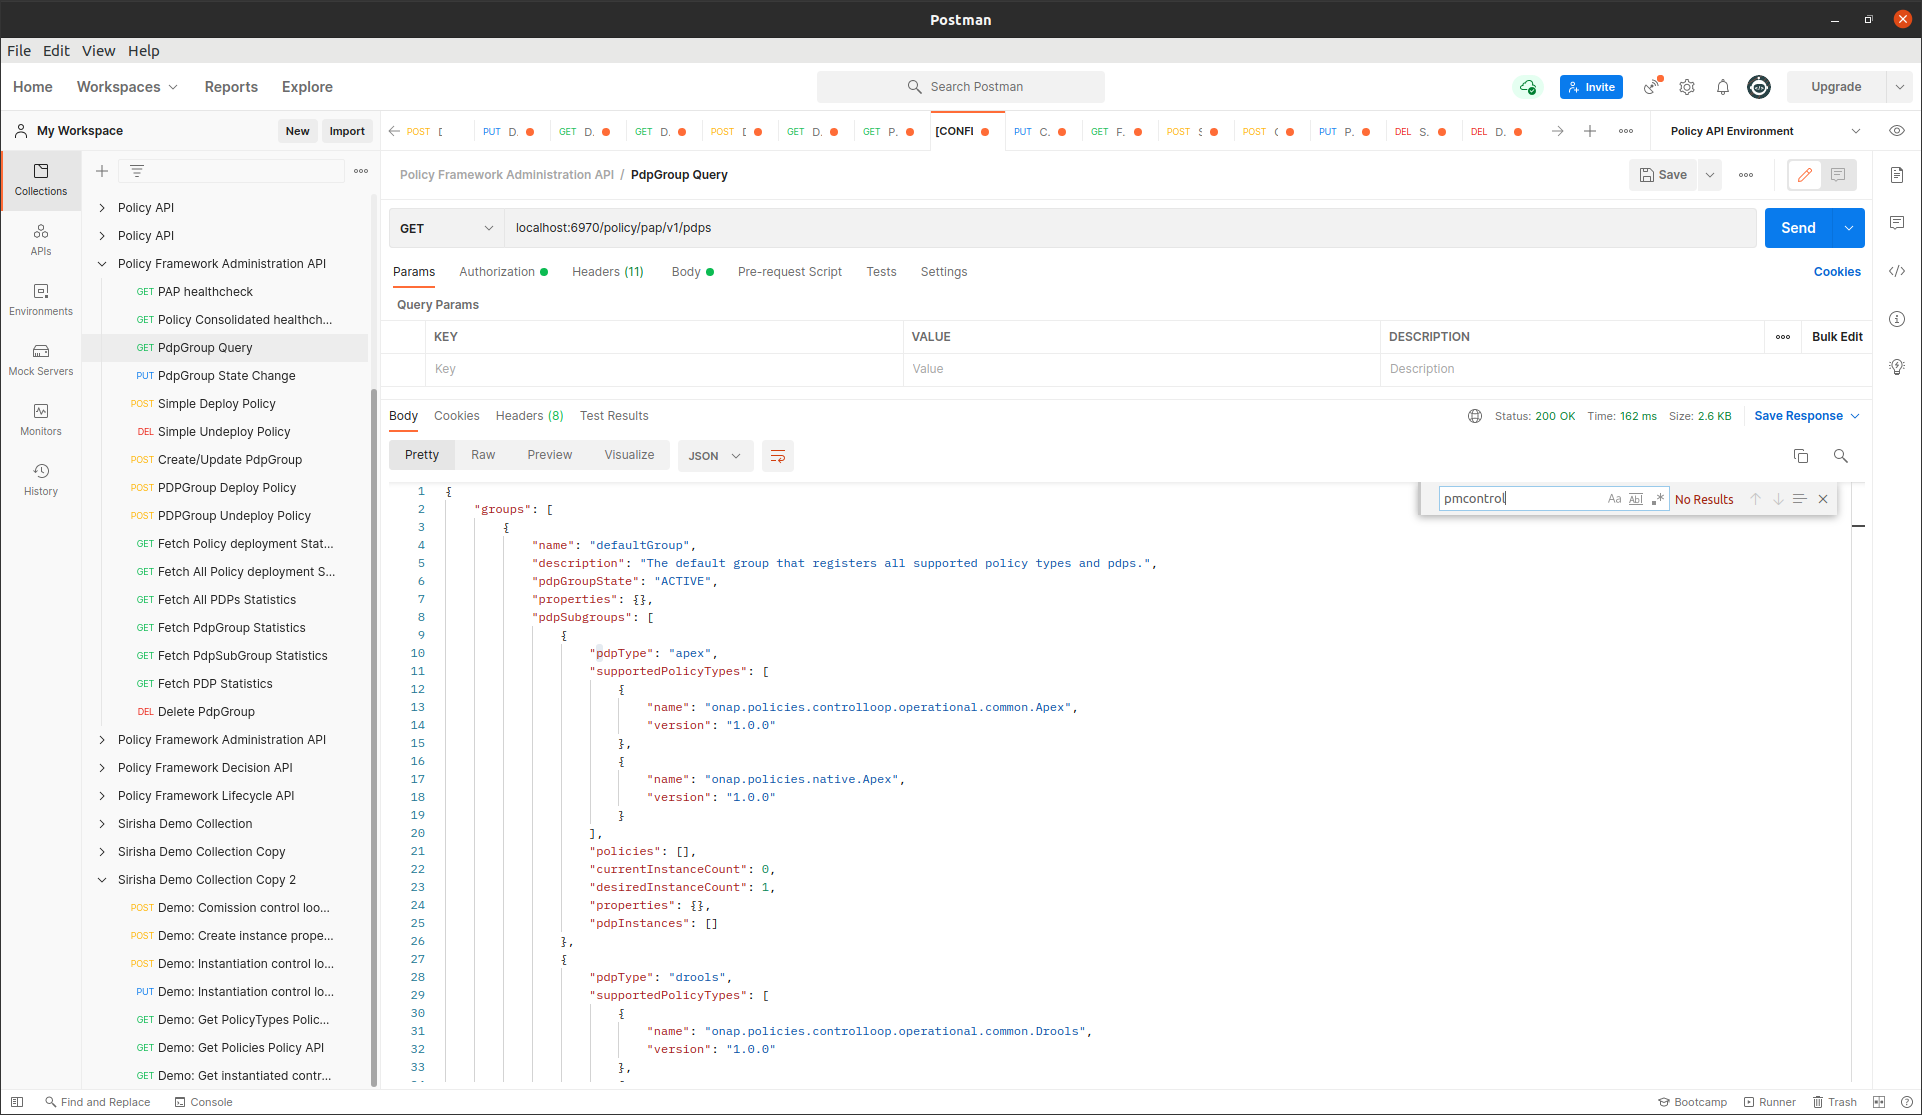
This state change will trigger the undeployment of the pmcontrol policy which was deployed previously. To verifiy this we do a PdpGroup Query as before and check that the pmcontrol policy has been undeployed and removed from the defaultGroup:
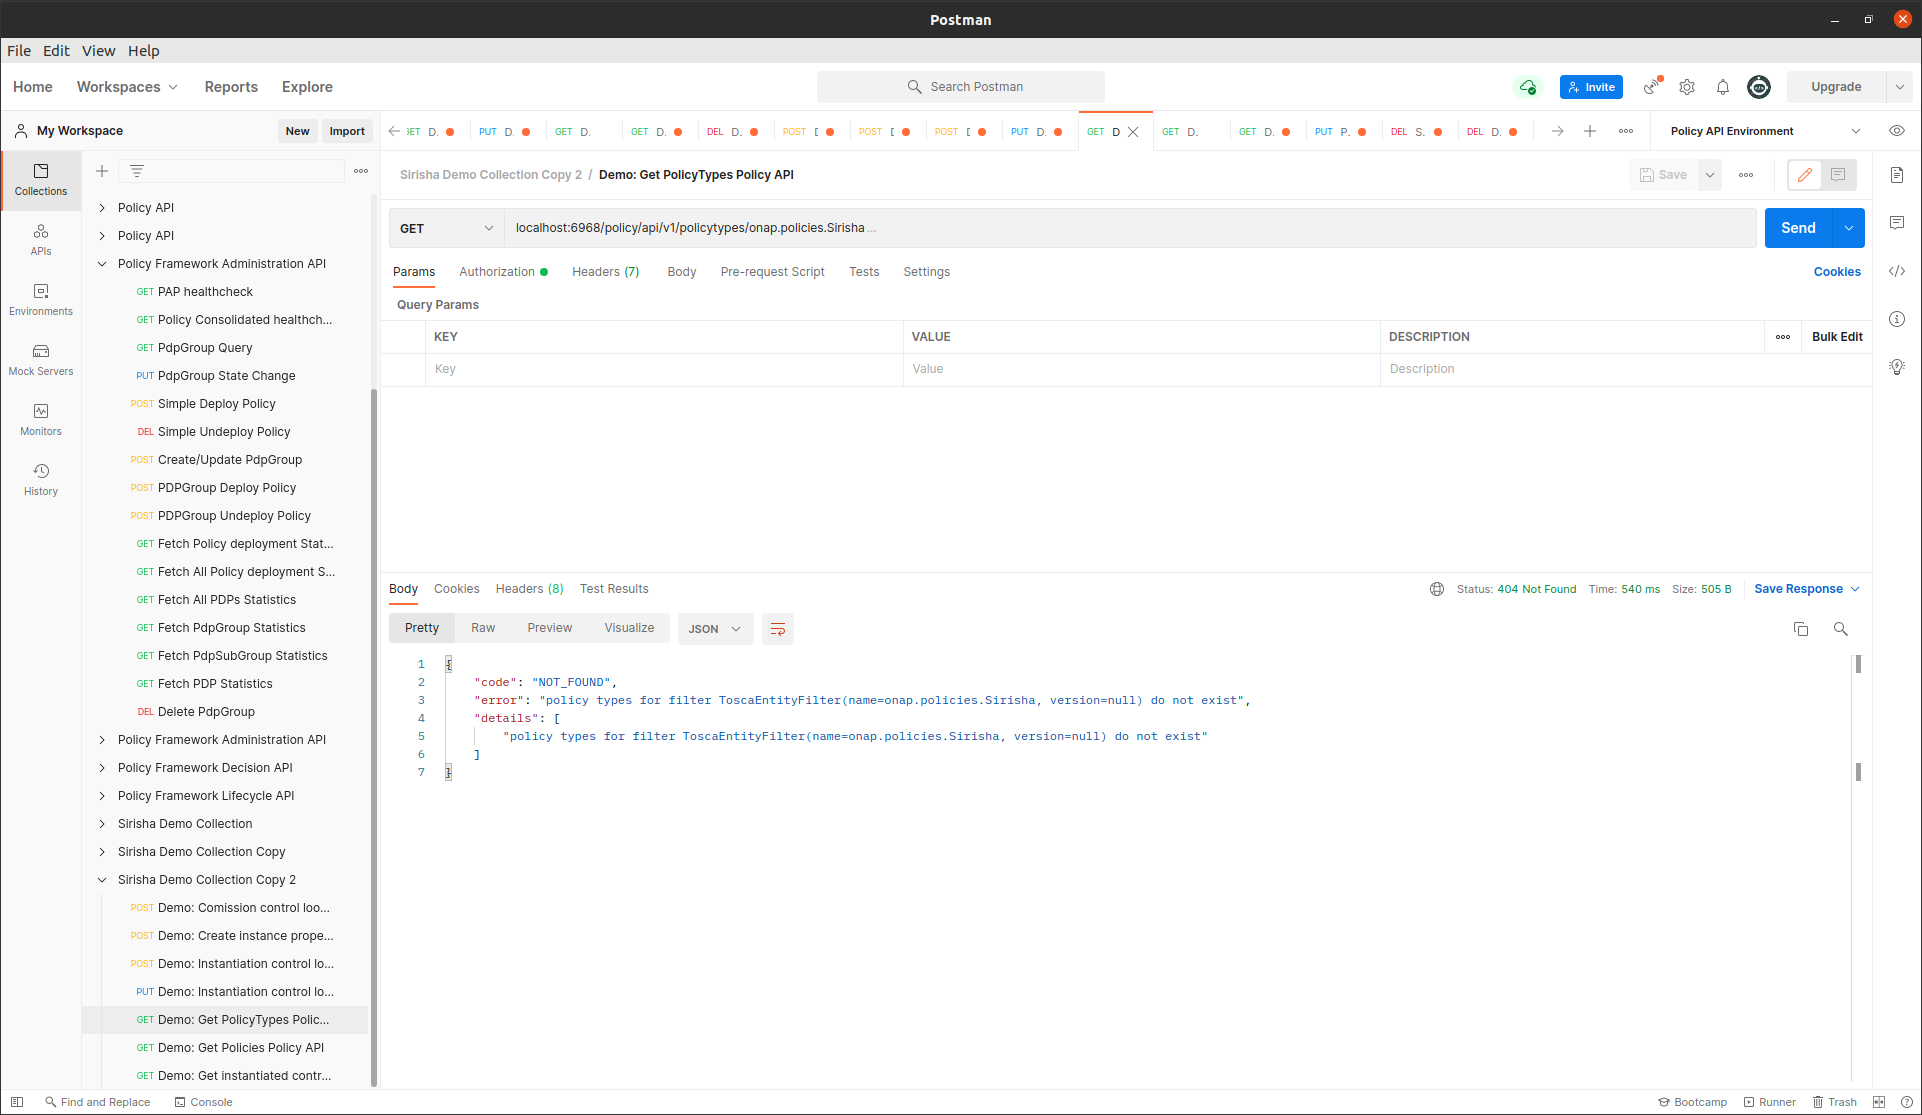
Deletion of policies and policyTypes:
The Controlloop STATE is changed from PASSIVE to UNINITIALISED using postman:
{
    "orderedState": "UNINITIALISED",
    "controlLoopIdentifierList": [
        {
            "name": "PMSHInstance0",
            "version": "1.0.1"
        }
    ]
}
This state change will trigger the deletion of the previously created policies and policyTypes. To verify this, as before, we can check that the Sirisha policyType is not found this time and likewise for the pmcontrol policy: