HowTo: My First Policy
Contents
Introduction
Consider a scenario where a supermarket chain called HyperM controls how it sells items in a policy-based manner. Each time an item is processed by HyperM’s point-of-sale (PoS) system an event is generated and published about that item of stock being sold. This event can then be used to update stock levels, etc..
HyperM want to extend this approach to allow some checks to be performed before the sale can be completed. This can be achieved by requesting a policy-controlled decision as each item is processed by for sale by each PoS system. The decision process is integrated with HyperM’s other IT systems that manage stock control, sourcing and purchasing, personnel systems, etc.
In this document we will show how APEX and APEX Policies can be used to achieve this, starting with a simple policy, building up to more complicated policy that demonstrates the features of APEX.
Data Models
Sales Input Event
Each time a PoS system processes a sales item an event with the following format is emitted:
Table 1. Sale Input Event¶ Event
Fields
Description
SALE_INPUT
time, sale_ID, amount, item_ID, quantity, assistant_ID, branch_ID, notes, …
Event indicating a sale of an item is occurring
In each
SALE_INPUTevent thesale_IDfield is a unique ID generated by the PoS system. A timestamp for the event is stored in thetimefield. Theamountfield refers to the value of the item(s) to be sold (in cents). Theitem_IDfield is a unique identifier for each item type, and can be used to retrieve more information about the item from HyperM’s stock control system. Thequantityfield refers to the quantity of the item to be sold. Theassistant_IDfield is a unique identifier for the PoS operator, and can be used to retrieve more information about the operator from the HyperM’s personnel system. Since HyperM has many branches thebranch_IDidentifies the shop. Thenotesfield contains arbitrary notes about the sale.Sales Decision Event
After a
SALE_INPUTevent is emitted by the PoS system HyperM’s policy-based controlled sales checking system emits a Sale Authorization Event indicating whether the sale is authorized or denied. The PoS system can then listen for this event before continuing with the sale.
Table 2. Sale Authorisation Event¶ Event
Fields
Description
SALE_AUTH
sale_ID, time, authorized, amount, item_ID, quantity, assistant_ID, branch_ID, notes, message…
Event indicating a sale of an item is authorized or denied
In each
SALE_AUTHevent thesale_IDfield is copied from theSALE_INPUTevent that trigger the decision request. TheSALE_AUTHevent is also timestamped using thetimefield, and a field calledauthorisedis set totrueorfalsedepending on whether the sale is authorized or denied. Themessagefield carries an optional message about why a sale was not authorized. The other fields from theSALE_INPUTevent are also included for completeness.Stock Control: Items
HyperM maintains information about each item for sale in a database table called
ITEMS.
Table 3. Items Database¶ Table
Fields
Description
ITEMS
item_ID, description, cost_price, barcode, supplier_ID, category, …
Database table describing each item for sale
The database table
ITEMShas a row for each items that HyperM sells. Each item is identified by anitem_IDvalue. Thedescriptionfield stores a description of the item. The cost price of the item is given incost_price. The barcode of the item is encoded inbarcode, while the item supplier is identified bysupplier_ID. Items may also be classified into categories using thecategoryfield. Useful categories might include:soft drinks,alcoholic drinks,cigarettes,knives,confectionery,bakery,fruit&vegetables,meat, etc..Personnel System: Assistants
Table 4. Assistants Database¶ Table
Fields
Description
ASSISTANTS
assistant_ID, surname, firstname, middlename, age, grade, phone_number, …
Database table describing each HyperM sales assistant
The database table
ASSISTANTShas a row for each sales assistant employed by HyperM. Each assistant is identified by anassistant_IDvalue, with their name given in thefirstname,middlenameandsurnamefields. The assistant’s age in years is given inage, while their phone number is contained in thephone_numberfield. The assistant’s grade is encoded ingrade. Useful values forgrademight include:trainee,operator,supervisor, etc..Locations: Branches
Table 5. Branches Database¶ Table
Fields
Description
BRANCHES
branch_ID, branch_Name, category, street, city, country, postcode, …
Database table describing each HyperM branch
HyperM operates a number of branches. Each branch is described in the
BRANCHESdatabase table. Each branch is identified by abranch_ID, with a branch name given inbranch_Name. The address for the branch is encoded instreet,city,countryandpostcode. The branch category is given in thecategoryfield. Useful values forcategorymight include:Small,Large,Super,Hyper, etc..
Policy Step 1
Scenario
For the first version of our policy, let’s start with something simple. Let us assume that there exists some restriction that alcohol products cannot be sold before 11:30am. In this section we will go through the necessary steps to define a policy that can enforce this for HyperM.
Alcohol cannot be sold before 11:30am…
New Policy Model
Create the an new empty Policy Model
MyFirstPolicyModelSince an organisation like HyperM may have many policies covering many different domains, policies should be grouped into policy sets. In order to edit or deploy a policy, or policy set, the definition of the policy(ies) and all required events, tasks, states, etc., are grouped together into a ‘Policy Model’. An organization might define many Policy Models, each containing a different set of policies.
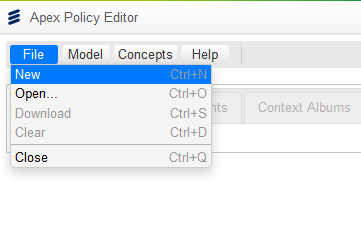
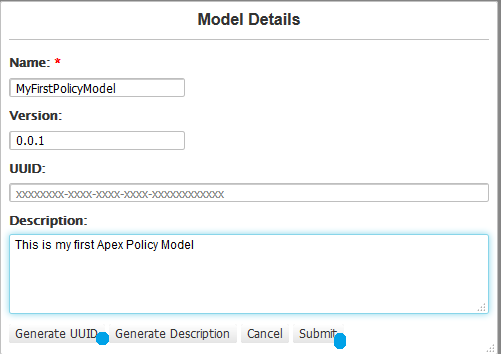
So the first step is to create a new empty Policy Model called
MyFirstPolicyModel. Using the APEX Policy Editor, click on the ‘File’ menus and select ‘New’. Then define our new policy model calledMyFirstPolicyModel. Use the ‘Generate UUID’ button to create a new unique ID for the policy model, and fill in a description for the policy model. Press theSubmitbutton to save your changes.
Events
Create the input event
SALE_INPUTand the output eventSALE_AUTHUsing the APEX Policy Editor, click on the ‘Events’ tab. In the ‘Events’ pane, right click and select ‘New’:
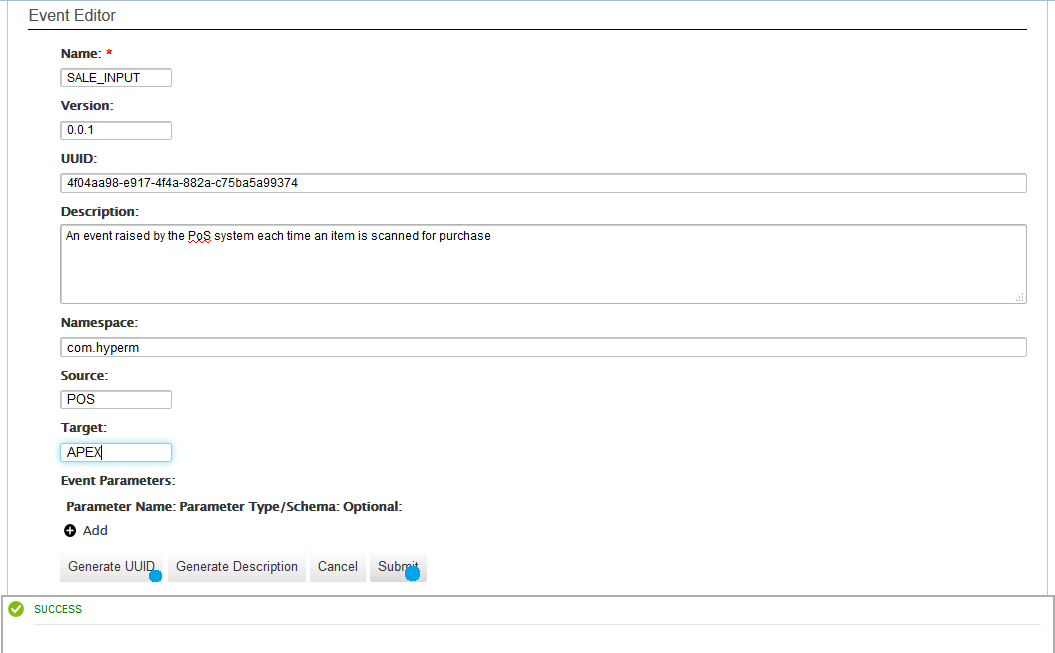
Create a new event type called
SALE_INPUT. Use the ‘Generate UUID’ button to create a new unique ID for the event type, and fill in a description for the event. Add a namespace, e.g.com.hyperm. We can add hard-coded strings for theSourceandTarget, e.g.POSandAPEX. At this stage we will not add any parameter fields, we will leave this until later. Use theSubmitbutton to create the event.
Repeat the same steps for a new event type called
SALE_AUTH. Just useAPEXas source andPOSas target, since this is the output event coming from APEX going to the sales point.Before we can add parameter fields to an event we must first define APEX Context Item Schemas that can be used by those fields.
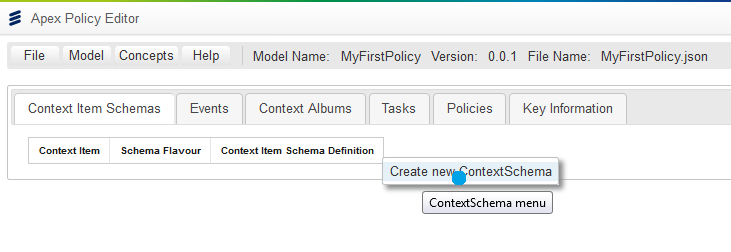
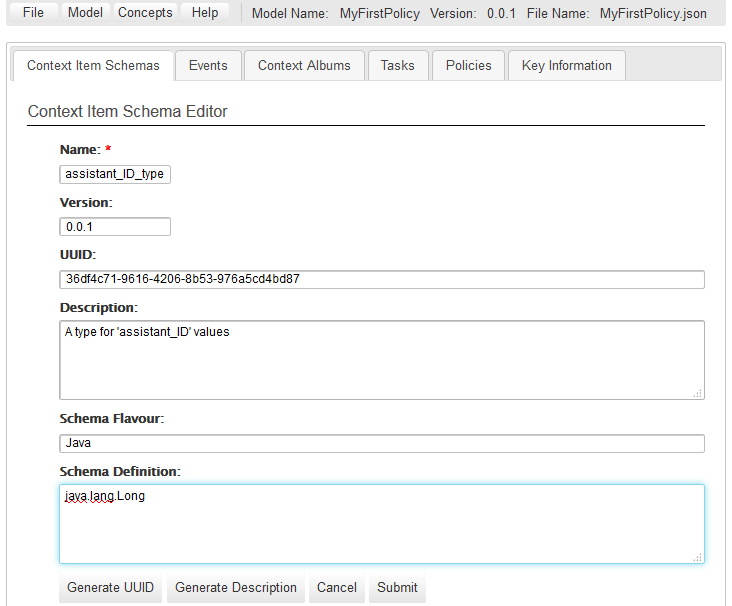
To create new item schemas, click on the ‘Context Item Schemas’ tab. In that ‘Context Item Schemas’ pane, right click and select ‘Create new ContextSchema’.
Create item schemas with the following characteristics, each with its own unique UUID:
Table 1. Item Schemas¶ Name
Schema Flavour
Schema Definition
Description
timestamp_type
Java
java.lang.Long
A type for
timevaluessale_ID_type
Java
java.lang.Long
A type for
sale_IDvaluesprice_type
Java
java.lang.Long
A type for
amo unt/pricevaluesitem_ID_type
Java
java.lang.Long
A type for
item_IDvaluesas sistant_ID_type
Java
java.lang.Long
A type for ` assistant_ID` values
quantity_type
Java
ja va.lang.Integer
A type for
quantityvaluesbranch_ID_type
Java
java.lang.Long
A type for
branch_IDvaluesnotes_type
Java
j ava.lang.String
A type for
notesvaluesauthorised_type
Java
ja va.lang.Boolean
A type for
authorisedvaluesmessage_type
Java
j ava.lang.String
A type for
messagevalues
The item schemas can now be seen on the ‘Context Item Schemas’ tab, and can be updated at any time by right-clicking on the item schemas on the ‘Context Item Schemas’ tab. Now we can go back to the event definitions for
SALE_INPUTandSALE_AUTHand add some parameter fields.Tip
APEX natively supports schema definitions in
JavaandAvro.Javaschema definitions are simply the name of a Java Class. There are some restrictions:
the class must be instantiatable, i.e. not an Java interface or abstract class
primitive types are not supported, i.e. use
java.lang.Integerinstead ofint, etc.it must be possible to find the class, i.e. the class must be contained in the Java classpath.
Avroschema definitions can be any valid Avro schema. For events using fields defined with Avro schemas, any incoming event containing that field must contain a value that conforms to the Avro schema.Click on the ‘Events’ tab, then right click the
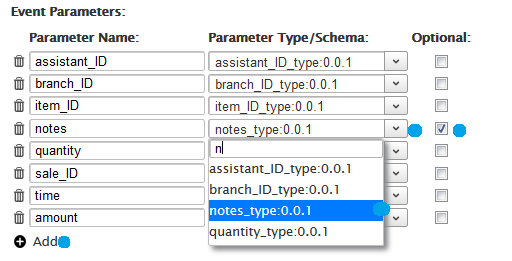
SALE_INPUTrow and select ‘Edit EventSALE_INPUT’. To add a new event parameter use the 'Add Event Parameter' button at the bottom of the screen. For the `SALE_INPUTevent add the following event parameters:
Table 2. Event Parameter Fields for the SALE_INPUTEvent¶Parameter Name
Parameter Type
Optional
time
timestamp_type
no
sale_ID
sale_ID_type
no
amount
price_type
no
item_ID
item_ID_type
no
quantity
quantity_type
no
assistant_ID
assistant_ID_type
no
branch_ID
branch_ID_type
no
notes
notes_type
yes
Remember to click the ‘Submit’ button at the bottom of the event definition pane.
Tip
Parameter fields can be optional in events. If a parameter is not marked as optional then by default it is mandatory, so it must appear in any input event passed to APEX. If an optional field is not set for an output event then value will be set to
null.
Select the
SALE_AUTHevent and add the following event parameters:
Table 3. Event Parameter Fields for the SALE_AUTHEvent¶Parameter Name
Parameter Type
no
sale_ID
sale_ID_type
no
time
timestamp_type
no
authorised
authorised_type
no
message
message_type
yes
amount
price_type
no
item_ID
item_ID_type
no
assistant_ID
assistant_ID_type
no
quantity
quantity_type
no
branch_ID
branch_ID_type
no
notes
notes_type
yes
Remember to click the ‘Submit’ button at the bottom of the event definition pane.
The events for our policy are now defined.

New Policy
Create a new Policy and add the “No Booze before 11:30” check
APEX policies are defined using a state-machine model. Each policy comprises one or more states that can be individually executed. Where there is more than one state the states are chained together to form a Directed Acyclic Graph (DAG) of states. A state is triggered by passing it a single input (or ‘trigger’) event and once executed each state then emits an output event. For each state the logic for the state is embedded in one or more tasks. Each task contains specific task logic that is executed by the APEX execution environment each time the task is invoked. Where there is more than one task in a state then the state also defines some task selection logic to select an appropriate task each time the state is executed.
Therefore, to create a new policy we must first define one or more tasks.
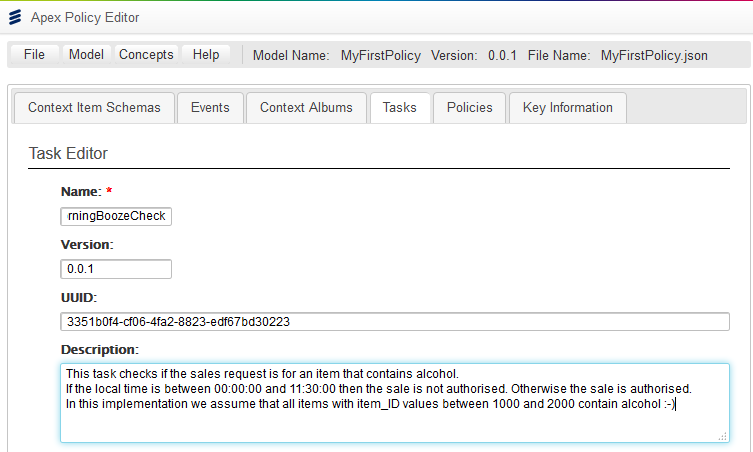
To create a new Task click on the ‘Tasks’ tab. In the ‘Tasks’ pane, right click and select ‘Create new Task’. Create a new Task called
MorningBoozeCheck. Use the ‘Generate UUID’ button to create a new unique ID for the task, and fill in a description for the task.
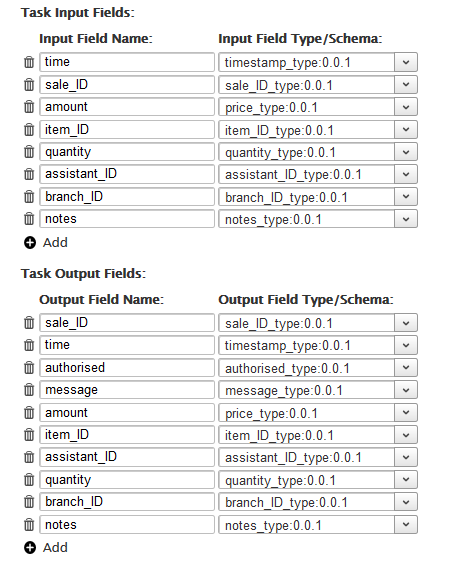
Tasks are configured with a set of input fields and a set of output fields. To add new input/output fields for a task use the ‘Add Task Input Field’ and ‘Add Task Output Field’ button. The list of input and out fields to add for the
MorningBoozeChecktask are given below. The input fields are drawn from the parameters in the state’s input event, and the task’s output fields are used to populate the state’s output event. The task’s input and output fields must be a subset of the event parameters defined for the input and output events for any state that uses that task. (You may have noticed that the input and output fields for theMorningBoozeChecktask have the exact same names and reuse the item schemas that we used for the parameters in theSALE_INPUTandSALE_AUTHevents respectively).
Table 1. Input fields for MorningBoozeChecktask¶Parameter Name
Parameter Type
time
timestamp_type
sale_ID
sale_ID_type
amount
price_type
item_ID
item_ID_type
quantity
quantity_type
assistant_ID
assistant_ID_type
branch_ID
branch_ID_type
notes
notes_type
Table 2. Output fields for MorningBoozeChecktask¶Parameter Name
Parameter Type
sale_ID
sale_ID_type
time
timestamp_type
authorised
authorised_type
message
message_type
amount
price_type
item_ID
item_ID_type
assistant_ID
assistant_ID_type
quantity
quantity_type
branch_ID
branch_ID_type
notes
notes_type
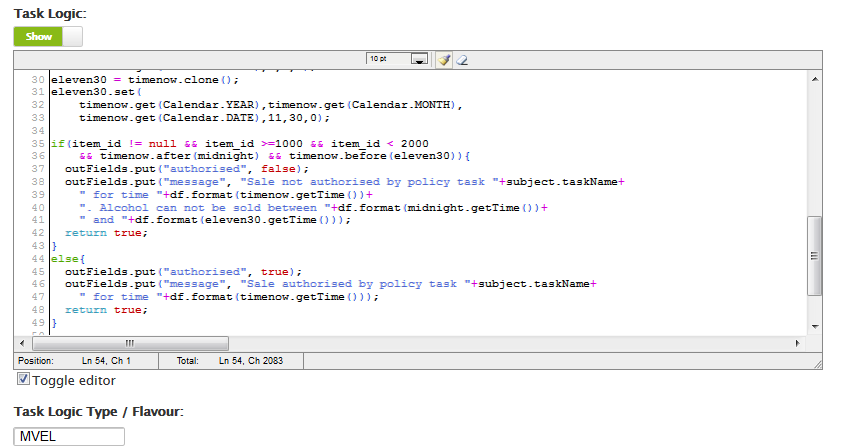
Each task must include some ‘Task Logic’ that implements the behaviour for the task. Task logic can be defined in a number of different ways using a choice of languages. For this task we will author the logic using the Java-like scripting language called
`MVEL<https://en.wikipedia.org/wiki/MVEL>`__.For simplicity use the code for the task logic here(Task Logic: MorningBoozeCheck.mvel). Paste the script text into the ‘Task Logic’ box, and use “MVEL” as the ‘Task Logic Type / Flavour’.
This logic assumes that all items with
item_IDbetween 1000 and 2000 contain alcohol, which is not very realistic, but we will see a better approach for this later. It also uses the standardJavatime utilities to check if the current time is between00:00:00 GMTand11:30:00 GMT. For a detailed guide to how to write your own logic in`JavaScript<https://en.wikipedia.org/wiki/JavaScript>`__,`MVEL<https://en.wikipedia.org/wiki/MVEL>`__ or one of the other supported languages please refer to APEX Programmers Guide.
An alternative version of the same logic is available in JavaScript(Task Logic: MorningBoozeCheck.js). Just use “JAVASCRIPT” as the ‘Task Logic Type / Flavour’ instead.
The task definition is now complete so click the ‘Submit’ button to save the task. The task can now be seen on the ‘Tasks’ tab, and can be updated at any time by right-clicking on the task on the ‘Task’ tab. Now that we have created our task, we can can create a policy that uses that task.
To create a new Policy click on the ‘Policies’ tab. In the ‘Policies’ pane, right click and select ‘Create new Policy’:
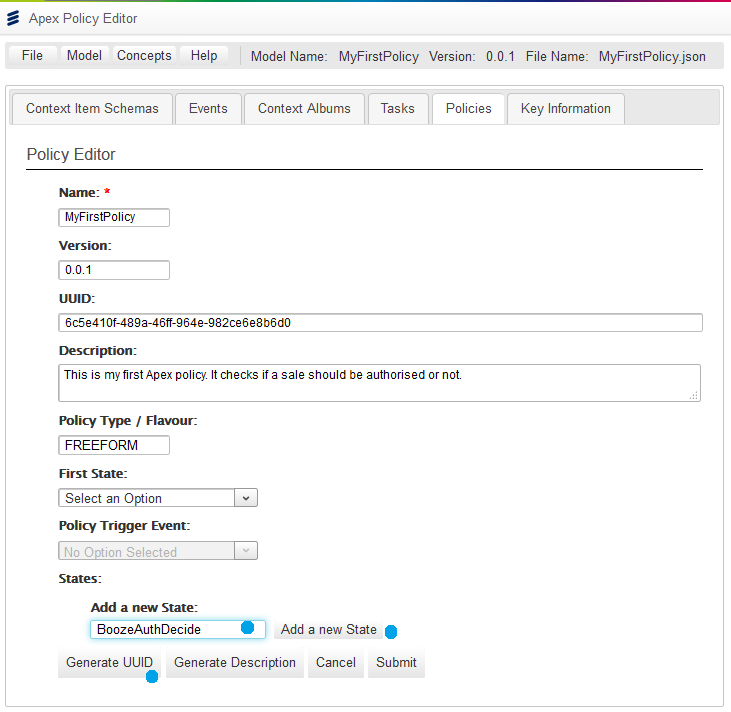
Create a new Policy called
MyFirstPolicy. Use the ‘Generate UUID’ button to create a new unique ID for the policy, and fill in a description for the policy. Use ‘FREEFORM’ as the ‘Policy Flavour’.Each policy must have at least one state. Since this is ‘freeform’ policy we can add as many states as we wish. Let’s start with one state. Add a new state called
BoozeAuthDecideto thisMyFirstPolicypolicy using the ‘Add new State’ button after filling in the name of our new state.
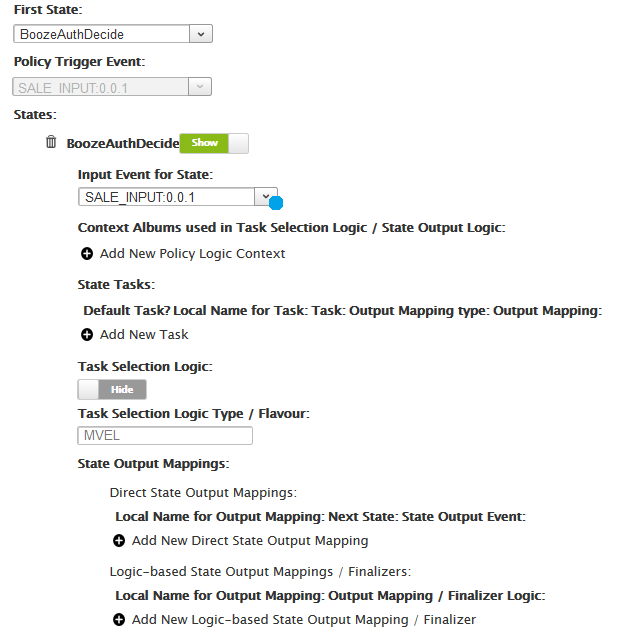
Each state must uses one input event type. For this new state select the
SALE_INPUTevent as the input event.Each policy must define a ‘First State’ and a ‘Policy Trigger Event’. The ‘Policy Trigger Event’ is the input event for the policy as a whole. This event is then passed to the first state in the chain of states in the policy, therefore the ‘Policy Trigger Event’ will be the input event for the first state. Each policy can only have one ‘First State’. For our
MyFirstPolicypolicy, selectBoozeAuthDecideas the ‘First State’. This will automatically selectSALE_INPUTas the ‘Policy Trigger Event’ for our policy.
In this case we will create a reference the pre-existing
MorningBoozeChecktask that we defined above using the ‘Add New Task’ button. Select theMorningBoozeChecktask, and use the name of the task as the ‘Local Name’ for the task.in the case where a state references more than one task, a ‘Default Task’ must be selected for the state and some logic (‘Task Selection Logic’) must be specified to select the appropriate task at execution time. Since our new state
BoozeAuthDecideonly has one task the default task is automatically selected and no ‘Task Selection Logic’ is required.Note
In a ‘Policy’ ‘State’ a ‘State Output Mapping’ has 3 roles: 1) Select which ‘State’ should be executed next, 2) Select the type of the state’s ‘Outgoing Event’, and 3) Populate the state’s ‘Outgoing Event’. This is how states are chained together to form a (Directed Acyclic Graph (DAG)) of states. The final state(s) of a policy are those that do not select any ‘next’ state. Since a ‘State’ can only accept a single type of event, the type of the event emitted by a previous ‘State’ must match the incoming event type of the next ‘State’. This is also how the last state(s) in a policy can emit events of different types. The ‘State Output Mapping’ is also responsible for taking the fields that are output by the task executed in the state and populating the state’s output populating the state’s output event before it is emitted.
Each ‘Task’ referenced in ‘State’ must have a defined ‘Output Mapping’ to take the output of the task, select an ‘Outgoing Event’ type for the state, populate the state’s outgoing event, and then select the next state to be executed (if any).
There are 2 basic types of output mappings:
Direct Output Mappings have a single value for ‘Next State’ and a single value for ‘State Output Event’. The outgoing event for the state is automatically created, any outgoing event parameters that were present in the incoming event are copied into the outgoing event, then any task output fields that have the same name and type as parameters in the outgoing event are automatically copied into the outgoing event.
Logic-Based State Output Mappings / Finalizers have some logic defined that dynamically selects and creates the ‘State Outgoing Event’, manages the population of the outgoing event parameters (perhaps changing or adding to the outputs from the task), and then dynamically selects the next state to be executed (if any).
Each task reference must also have an associated ‘Output State Mapping’ so we need an ‘Output State Mapping’ for the
BoozeAuthDecidestate to use when theMorningBoozeChecktask is executed. The simplest type of output mapping is a ‘Direct Output Mapping’.Create a new ‘Direct Output Mapping’ for the state called
MorningBoozeCheck_Output_Directusing the ‘Add New Direct State Output Mapping’ button. SelectSALE_AUTHas the output event and selectNonefor the next state value. We can then select this output mapping for use when the theMorningBoozeChecktask is executed. Since there is only state, and only one task for that state, this output mapping ensures that theBoozeAuthDecidestate is the only state executed and the state (and the policy) can only emit events of typeSALE_AUTH. (You may remember that the output fields for theMorningBoozeChecktask have the exact same names and reuse the item schemas that we used for the parameters inSALE_AUTHevent. TheMorningBoozeCheck_Output_Directdirect output mapping can now automatically copy the values from theMorningBoozeChecktask directly into outgoingSALE_AUTHevents.)
Click the ‘Submit’ button to complete the definition of our
MyFirstPolicypolicy. The policyMyFirstPolicycan now be seen in the list of policies on the ‘Policies’ tab, and can be updated at any time by right-clicking on the policy on the ‘Policies’ tab.The
MyFirstPolicyModel, including ourMyFirstPolicypolicy can now be checked for errors. Click on the ‘Model’ menu and select ‘Validate’. The model should validate without any ‘Warning’ or ‘Error’ messages. If you see any ‘Error’ or ‘Warning’ messages, carefully read the message as a hint to find where you might have made a mistake when defining some aspect of your policy model.
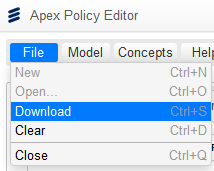
Congratulations, you have now completed your first APEX policy. The policy model containing our new policy can now be exported from the editor and saved. Click on the ‘File’ menu and select ‘Download’ to save the policy model in JSON format. The exported policy model is then available in the directory you selected, for instance
$APEX_HOME/examples/models/MyFirstPolicy/1/MyFirstPolicyModel_0.0.1.json. The exported policy can now be loaded into the APEX Policy Engine, or can be re-loaded and edited by the APEX Policy Editor.


Test The Policy
Test Policy Step 1
To start a new APEX Engine you can use the following configuration. In a full APEX installation you can find this configuration in
$APEX_HOME/examples/config/MyFirstPolicy/1/MyFirstPolicyConfigStdin2StdoutJsonEvent.json. This configuration expects incoming events to be inJSONformat and to be passed into the APEX Engine fromstdin, and result events will be printed inJSONformat tostdout. This configuration loads the policy model stored in the file ‘MyFirstPolicyModel_0.0.1.json’ as exported from the APEX Editor. Note, you may need to edit this file to provide the full path to wherever you stored the exported policy model file.To test the policy try paste the following events into the console as the APEX engine executes:
Title¶ Input Event (JSON)
Output Event (JSON)
comment
Request to buy a non-alcoholic item (item_ID=5123) at 10:13:09 on Tuesday, 10 January 2017. Sale is authorized.
Request to buy alcohol item (item_ID=1249) at 08:41:06 on Monday, 02 January 2017. Sale is not authorized.
Request to buy alcohol (item_ID=1943) at 20:17:13 on Tuesday, 20 December 2016. Sale is authorized.
CLI Editor File
Policy 1 in CLI Editor
An equivalent version of the
MyFirstPolicyModelpolicy model can again be generated using the APEX CLI editor. A sample APEX CLI script is shown below:
Policy Step 2
Scenario
HyperM have just opened a new branch in a different country, but that country has different rules about when alcohol can be sold! In this section we will go through the necessary steps to extend our policy to enforce this for HyperM.
In some branches alcohol cannot be sold before 1pm, and not at all on Sundays.
Although there are a number of ways to accomplish this the easiest approach for us is to define another task and then select which task is appropriate at runtime depending on the branch identifier in the incoming event.
Extend Policy Model
Extend the Policy with the new Scenario
To create a new Task click on the ‘Tasks’ tab. In the ‘Tasks’ pane, right click and select ‘Create new Task’:
Create a new Task called
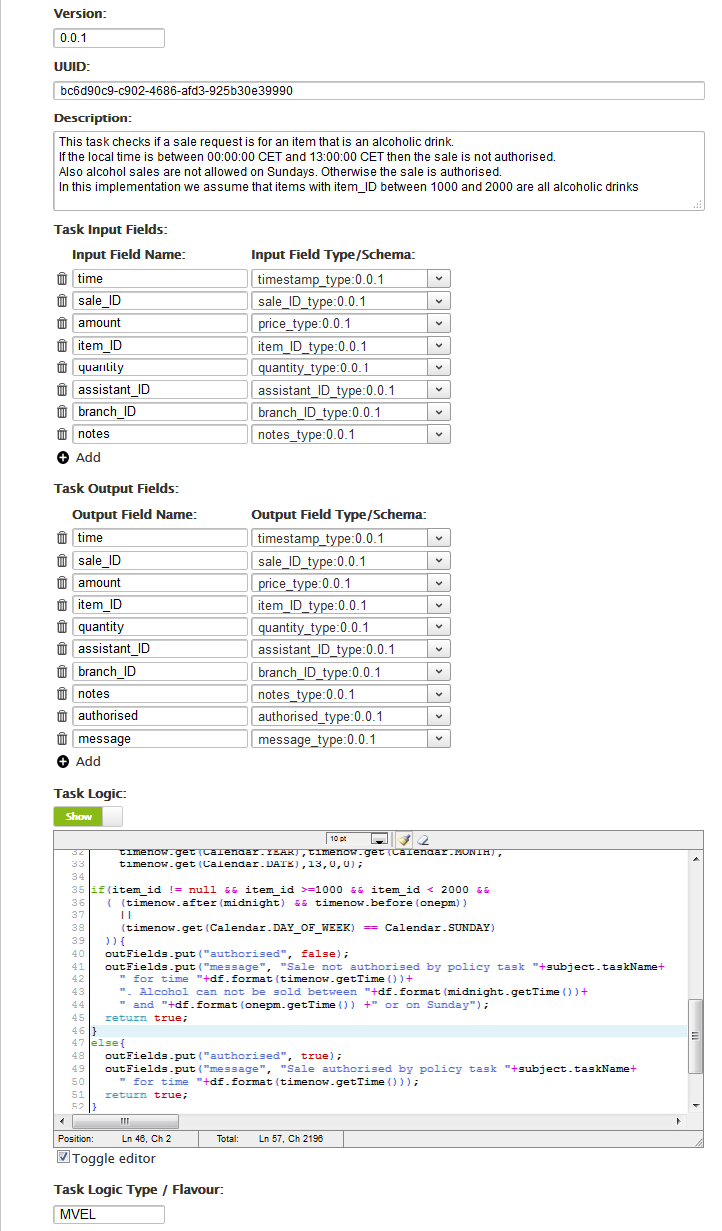
MorningBoozeCheckAlt1. Use the ‘Generate UUID’ button to create a new unique ID for the task, and fill in a description for the task. Select the same input and output fields that we used earlier when we defined theMorningBoozeChecktask earlier.
Table 1. Input fields for MorningBoozeCheckAlt1task¶Parameter Name
Parameter Type
time
timestamp_type
sale_ID
sale_ID_type
amount
price_type
item_ID
item_ID_type
quantity
quantity_type
assistant_ID
assistant_ID_type
branch_ID
branch_ID_type
notes
notes_type
Table 2. Output fields for MorningBoozeCheckAlt1task¶Parameter Name
Parameter Type
sale_ID
sale_ID_type
time
timestamp_type
authorised
authorised_type
message
message_type
amount
price_type
item_ID
item_ID_type
assistant_ID
assistant_ID_type
quantity
quantity_type
branch_ID
branch_ID_type
notes
notes_type
This task also requires some ‘Task Logic’ to implement the new behaviour for this task.
For simplicity use the following code for the task logic (`MorningBoozeCheckAlt1` task logic (`MVEL`)). It again assumes that all items with
item_IDbetween 1000 and 2000 contain alcohol. We again use the standardJavatime utilities to check if the current time is between00:00:00 CETand13:00:00 CETor if it isSunday.For this task we will again author the logic using the
`MVEL<https://en.wikipedia.org/wiki/MVEL>`__ scripting language. Sample task logic code (specified in`MVEL<https://en.wikipedia.org/wiki/MVEL>`__) is given below. For a detailed guide to how to write your own logic in`JavaScript<https://en.wikipedia.org/wiki/JavaScript>`__,`MVEL<https://en.wikipedia.org/wiki/MVEL>`__ or one of the other supported languages please refer to APEX Programmers Guide.
The task definition is now complete so click the ‘Submit’ button to save the task. Now that we have created our task, we can can add this task to the single pre-existing state (
BoozeAuthDecide) in our policy.To edit the
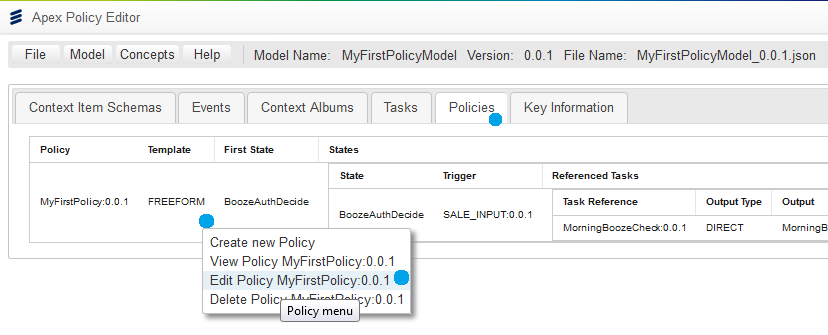
BoozeAuthDecidestate in our policy click on the ‘Policies’ tab. In the ‘Policies’ pane, right click on ourMyFirstPolicypolicy and select ‘Edit’. Navigate to theBoozeAuthDecidestate in the ‘states’ section at the bottom of the policy definition pane.
To add our new task
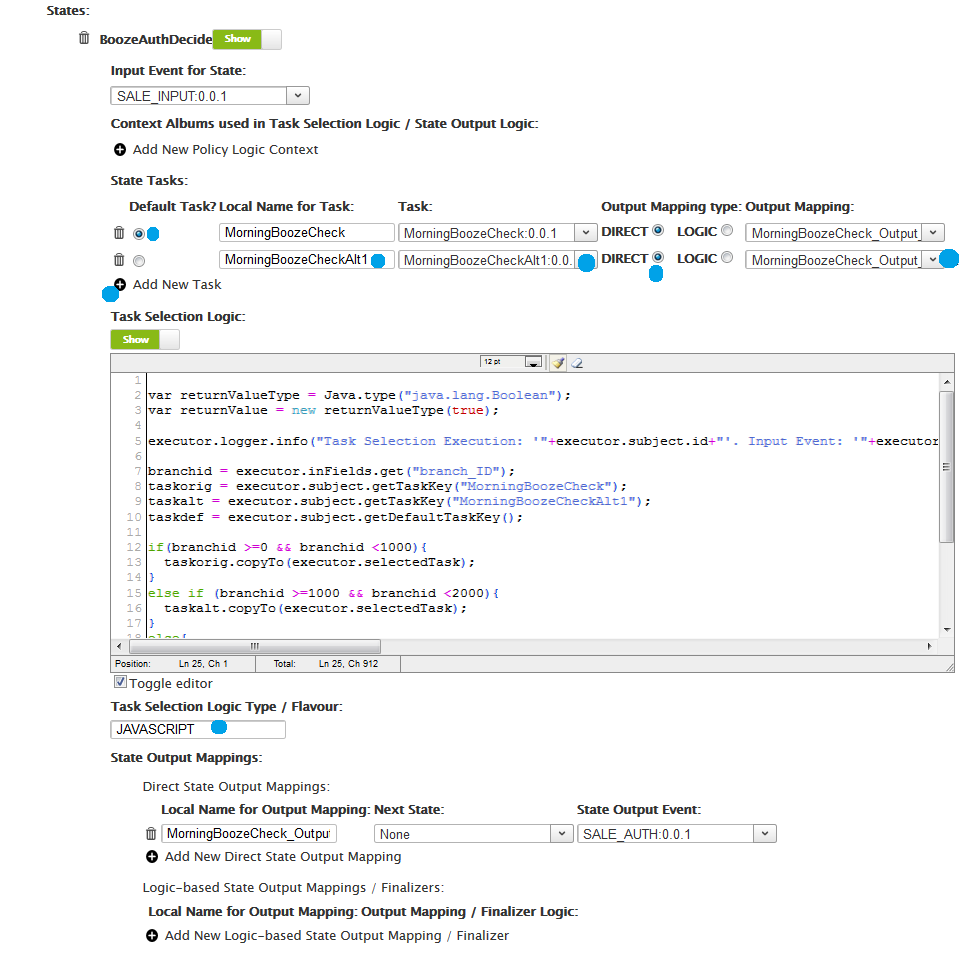
MorningBoozeCheckAlt1, scroll down to theBoozeAuthDecidestate in the ‘States’ section. In the ‘State Tasks’ section forBoozeAuthDecideuse the ‘Add new task’ button. Select our newMorningBoozeCheckAlt1task, and use the name of the task as the ‘Local Name’ for the task. TheMorningBoozeCheckAlt1task can reuse the sameMorningBoozeCheck_Output_Direct‘Direct State Output Mapping’ that we used for theMorningBoozeChecktask. (Recall that the role of the ‘State Output Mapping’ is to select the output event for the state, and select the next state to be executed. These both remain the same as before.)Since our state has more than one task we must define some logic to determine which task should be used each time the state is executed. This task selection logic is defined in the state definition. For our
BoozeAuthDecidestate we want the choice of which task to use to be based on thebranch_IDfrom which theSALE_INPUTevent originated. For simplicity sake let us assume that branches withbranch_IDbetween0and999should use theMorningBoozeChecktask, and the branches with withbranch_IDbetween1000and1999should use theMorningBoozeCheckAlt1task.This time, for variety, we will author the task selection logic using the
`JavaScript<https://en.wikipedia.org/wiki/JavaScript>`__ scripting language. Sample task selection logic code is given here (`BoozeAuthDecide` task selection logic (`JavaScript`)). Paste the script text into the ‘Task Selection Logic’ box, and use “JAVASCRIPT” as the ‘Task Selection Logic Type / Flavour’. It is necessary to mark one of the tasks as the ‘Default Task’ so that the task selection logic always has a fallback default option in cases where a particular task cannot be selected. In this case theMorningBoozeChecktask can be the default task.
When complete don’t forget to click the ‘Submit’ button at the bottom of ‘Policies’ pane for our
MyFirstPolicypolicy after updating theBoozeAuthDecidestate.Congratulations, you have now completed the second step towards your first APEX policy. The policy model containing our new policy can again be validated and exported from the editor and saved as shown in Step 1.
The exported policy model is then available in the directory you selected, as MyFirstPolicyModel_0.0.1.json. The exported policy can now be loaded into the APEX Policy Engine, or can be re-loaded and edited by the APEX Policy Editor.
Test The Policy
Test Policy Step 2
To start a new APEX Engine you can use the following configuration. In a full APEX installation you can find this configuration in
$APEX_HOME/examples/config/MyFirstPolicy/2/MyFirstPolicyConfigStdin2StdoutJsonEvent.json. Note, this has changed from the configuration file in Step 1 to enable theJAVASCRIPTexecutor for our new ‘Task Selection Logic’.To test the policy try paste the following events into the console as the APEX engine executes. Note, all tests from Step 1 will still work perfectly since none of those events originate from a branch with
branch_IDbetween1000and2000. The ‘Task Selection Logic’ will therefore pick theMorningBoozeChecktask as expected, and will therefore give the same results.
Table 1. Inputs and Outputs when testing My First Policy¶ Input Event (JSON)
Output Event (JSON)
comment
Request to buy alcohol item (item_ID=1249) at 08:41:06 GMT on Monday, 02 January 2017. Sale is not authorized. Uses the MorningBoozeCheck task.
Request to buy alcohol (item_ID=1047) at 10:14:33 on Thursday, 22 December 2016. Sale is not authorized. Uses the MorningBoozeCheckAlt1 task.
Request to buy alcohol (item_ID=1443) at 17:19:37 on Sunday, 18 December 2016. Sale is not authorized. Uses the MorningBoozeCheckAlt1 task.
Request to buy non-alcoholic item (item_ID=5321) at 11:13:09 on Monday, 2 January 2017. Sale is authorized. Uses the MorningBoozeCheckAlt1 task.
CLI Editor File
Policy 2 in CLI Editor
An equivalent version of the
MyFirstPolicyModelpolicy model can again be generated using the APEX CLI editor. A sample APEX CLI script is shown below: