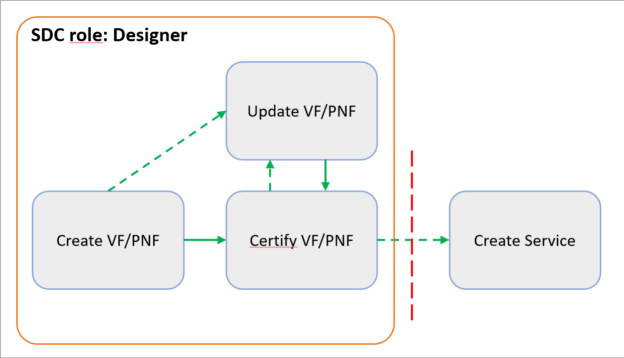
VF/PNF Creation and Testing
Goal: Using VSPs, create one or more VFs/PNFs as the building blocks for a service. Validate and certify the VFs/PNFs.
ONAP Component: SDC
SDC user roles: Designer
Steps
Create a VF/PNF by VSP import
Prerequisites: (see Resource Onboarding )
Create a license for each VF/PNF
Create a Vendor Software Product.
Steps
From the SDC HOME page, hover over Import, then click on IMPORT VSP
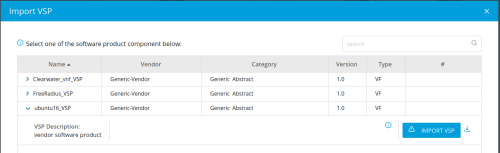
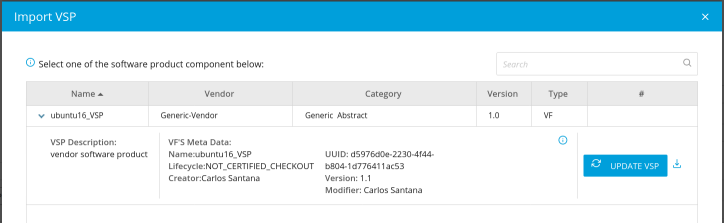
From the Import VSP box, expand a VSP name and click the Import VSP icon.
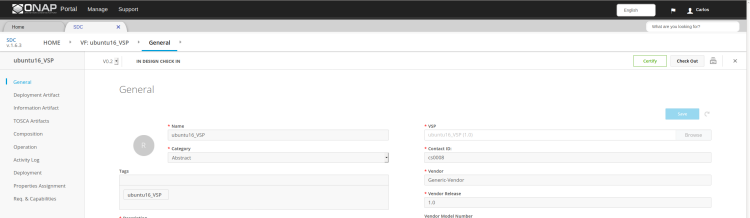
In the General section, complete all fields.
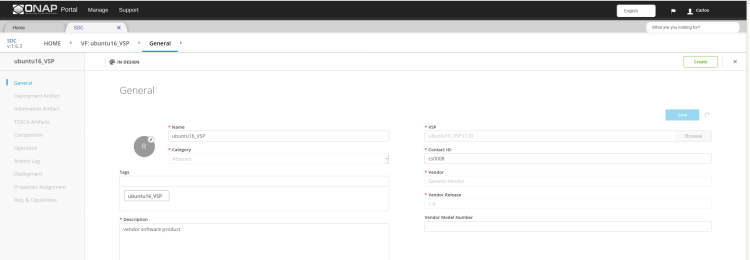
Click Create.
A message displays while creation is in progress. (This can take up to 10 minutes.)
A message displays when creation is complete.
[Optional] At any time before checking in the VF/PNF, click these options to update VF/PNF information:
Note
These tasks can be done only before certifying the VF/PNF.
General->Icon change the icon associated with the VF/PNF (vendor-supplied icons are preferred)
Deployment Artifacts download, view, modify, or change deployment artifacts (for example, the contents of the Heat .zip file, which contains the Heat volume template, the license, CDS Blueprints,…)
Information Artifacts view or upload artifacts, such as test scripts, test results, or the AIC questionnaire
TOSCA Artifacts view or upload the TOSCA model or the TOSCA template
Composition view or edit the graphical representation of the resource-level TOSCA model (generated from the Heat template)
Activity Log view activity related to assets associated with the VF/PNF (displays the action, date, user, status, and any comments related to each action)
Deployment view VF modules defined in the Heat template
Properties Assignment define or update properties and input parameters and policies
Req.& Capabilities view and add requirements and capabilities
Click Check In to save changes.
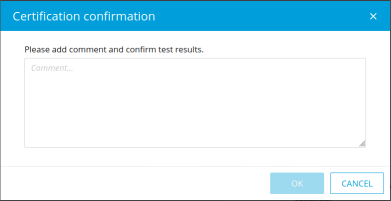
A box to enter comments for confirming the changes open.
Enter a comment and click OK.
A message displays when the VF/PNF is checked in and you are redirected to the Home screen.
After creating and checking a VF/PNF, certify it (see Certify VF/PNF).
Create a VF/PNF manually
Steps
From the SDC HOME page, hover over Add, then click on ADD VF or ADD PNF.
In the General section, complete all fields.
Before check-in the VF/PNF, click these options to update VF/PNF information:
Note
These tasks can be done only before certifying the VF/PNF.
General->Icon change the icon associated with the VF/PNF (vendor-supplied icons are preferred)
Deployment Artifacts download, view, modify, or change deployment artifacts (for example, the contents of the Heat .zip file, which contains the Heat volume template, the license, CDS Blueprints,…)
Information Artifacts view or upload artifacts, such as test scripts, test results, or the AIC questionnaire
TOSCA Artifacts view or upload the TOSCA model or the TOSCA template
Composition view or edit the graphical representation of the resource-level TOSCA model (generated from the Heat template)
Activity Log view activity related to assets associated with the VF/PNF (displays the action, date, user, status, and any comments related to each action)
Deployment view VF modules defined in the Heat template
Properties Assignment define or update properties and input parameters and policies
Req.& Capabilities view and add requirements and capabilities
Click Create.
A message displays while creation is in progress. (This can take up to 10 minutes.)
A message displays when creation is complete.
Click Check In to save changes.
A box to enter comments for confirming the changes open.
Enter a comment and click OK.
A message displays when the VF/PNF is checked in and you are redirected to the Home screen.
After creating and checking a VF/PNF, certify it (see Certify VF/PNF).
Update a VF/PNF [optional]
Update the VSP and other artifacts in a VF/PNF.
Upload a new version the VSP to the VF/PNF whenever the VSP is updated (see steps 3 to 5).
Other reasons for updating a VF/PNF include:
artifact changes at the VF/PNF level that need be uploaded, for example, changes to ENV values (see step 6)
Prerequisites:
If the VSP was updated: Update a VSP [optional]
Steps
From the SDC HOME page, click CATALOG and search for the VF/PNF, click on selected VF/PNF to update.
In the General section, click Check Out. The VSP field is displays.
In the VSP field, click Browse. The Import VSP box displays and shows the VSP that was used to create the VF/PNF.
Expand the VSP field and click.
Click Update VSP A progress bar displays.

Click Deployment Artifact to edit, upload, or delete associated [Optional] deployment artifacts.
Click Information Artifact and edit, upload, or delete associated [Optional] information artifacts.
Click Check In to save changes.
A box to enter comments for confirming the changes open.
Enter a comment and click OK.
A message displays when the VF/PNF is checked in and you are redirected to the Home screen.
After updating the VF/PNF:
Certify it (see Certify VF/PNF).
Update the VF/PNF version in any service that contains the VF/PNF, please go to Update Service [optional]
Certify VF/PNF
Prerequisites: Create a VF/PNF by VSP import or Create a VF/PNF manually
Steps
When a VF/PNF is ready for certification, On the SDC HOME page, click CATALOG and search for the checked-in VF/PNF. Bottom half of the VN/PNF will say “In Design Check In”.
Click the VF/PNF and click Certify.
Enter a comment and click OK.
A Message appears, that the VF/PNF is certified.