Graphical User Interface
If desired, a graphical user interface is also provided when the application has been installed from source. This can provide a convenient wrapper that enables users to perform validations without using extensive command-line usage.
At this time the application can only be run from source, but in the future a packaged version may be provided.
How to Start the Application
Ensure you have installed the application and its dependencies from source as described in the Installation chapter
Navigate to the
ice_validatordirectory:> cd <vvp-directory>/ice_validator
Launch the gui using the
vvp.pycommand:> python vvp.py
How to Use the Tool
Note
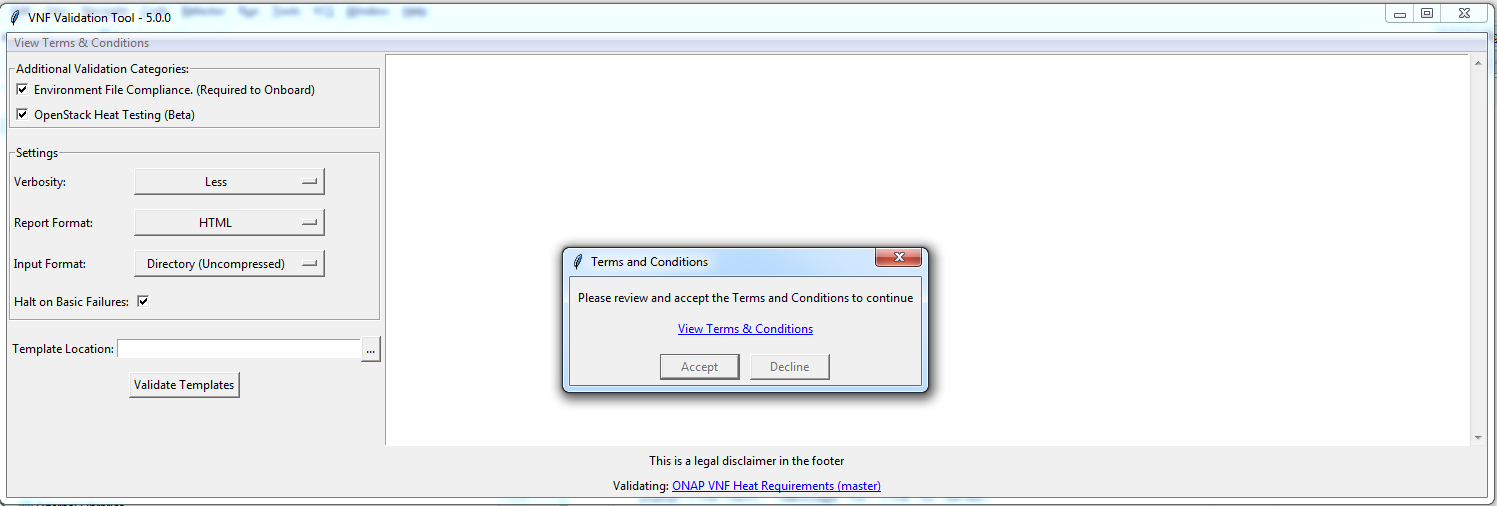
The look-and-feel of the application will vary slightly depending on the Operating System of the host machine. The screenshot below is how the application looks on a Windows machine.
Sample Screenshot of VVP GUI Application

All configuration options available to the command-line version of the application are exposed as options on the left-hand side of the GUI.
Additional Validation Categories
This allows the base set of tests to be extended by selecting additional categories of tests. At this time, only one additional category is supported.
This maps to the --category command-line option.
Category |
Description |
|---|---|
Environment File Compliance |
When selected, VVP will flag parameters in environment
files that should be excluded per the ONAP Heat
requirements. De-selecting this can be useful when
when testing instantiation directly in OpenStack
without ONAP orchestration. This is equivalent to
specifying |
OpenStack Heat Testing |
When selected, will validate the Heat templates are valid per OpenStack specifications (using the latest version of OpenStack available). If not selected, then VVP will only validate that the Heat is compliant with ONAP rules. |
Settings
Preload Template - Determines the format of the preload template that will be generated by VVP. The preload template can be completed to load per-instance values into SDNC. This allows the SDC model to be generic and re-used across environments. There are currently two formats supported by ONAP (VNF-API and GR-API)
Report Format - Controls the format of the output report generated after
validation. The options are: HTML (the default), Excel, and CSV. This is
equivalent the --report-format command-line option with the exception,
that the JSON format is not supported via the GUI.
Input Format - Controls the expected format of the template files. This can either be a ZIP file containing the Heat templates or a directory containing the Heat templates. There is no ZIP file option for the command-line script at this time.
Halt on Basic Failures - VVP deems certain tests as “base tests” which if
failed have the potential to generate a large number of other errors. This
would include tests such as validating that the Heat templates are valid
YAML. If checked, the tool will immediately stop all other tests and show
a report of this single failure. This can be useful in reducing the number
of errors to sift through in these situations. De-selecting this option
is the equivalent of specifying --continue-on-failure as a command-line option.
Create Preloads from Env Files - When selected, the Env Files file selection box will be enabled allow the user to select a directory of .env file definitions that can be used to populate a preload template. See Preload Generation for more details
Running Validations
Select the desired preload format (VNF-API or GR-API)
Select the desired input format in the settings (ZIP or Directory)
Select the […] button next to the Template Location input box
Select the directory or ZIP file containing the Heat templates, and then click Open
Once the input is selected, select the “Validate Templates” button to start the validation process. The white box to the right will display output as the validations are executed.
Once validation is complete a summary of pass and fail will be written to the output window, and a “View Report” option will appear on the left-hand control panel.
Select the “View Report” option, and the report will be opened in the the appropriate application based on report format.
If you have questions about report output, please refer to the Validation Report reference material for more information.
Customizing the GUI
The VVP GUI offers an ONAP Operator a number of ways to configure the GUI text
and behavior via a configuration file called vvp-config.yaml located in
the ice_validator directory. Customizing the GUI would require packaging
the VVP GUI with a modified configuration file.
Basic Customizations
This section will cover what the standard configurations that can tweak the display and options displayed in the default GUI.
Here is a sample of the current configuration file. Please note that some of these settings may not be used in the default ONAP configuration.
namespace: org.onap.vvp
owner: ONAP
ui:
  app-name: VNF Validation Tool
  disclaimer-text: This is a legal disclaimer in the footer
  requirement-link-text: ONAP VNF Heat Requirements (master)
  requirement-link-url: https://onap.readthedocs.io/en/latest/submodules/vnfrqts/requirements.git/docs/Chapter5/Heat/index.html
categories:
  - name: Environment File Compliance. (Required to Onboard)
    category: environment_file
    description:
      Checks certain parameters are excluded from the .env file, per HOT Requirements.
      Required for ASDC onboarding, not needed for manual Openstack testing.
  - name: OpenStack Heat Testing (Beta)
    category: openstack
    description:
      Uses the latest OpenStack Heat community version available to validate that
      a heat template is valid OpenStack Heat. This testing is equivalent to using
      heat template-validate from the command line.
settings:
  polling-freqency: 1000
  default-verbosity: Standard
Available Configuration Settings
namespace(required)Use: Users prior selections in the GUI are saved in an OS-specific application directory for per user settings. This namespace is used to segregate these cached settings from other versions of the validation tool
When to Modify: If you are packaging a new version of the application, then this field should be changed to ensure a user running the standard ONAP version and your custom version do not encounter conflicts in saved settings.
owner(required)Use: Similar to
namespacethis is used to segregate the cached application setting selections.When to Modify: If you are packaging a new version of the application, then this field should be changed to ensure a user running the standard ONAP version and your custom version do not encounter conflicts in saved settings.
ui.app-name: (optional - Default is VNF Validation Tool)Use: Controls the name of the application displayed in the title bar
When to Modify: When you want the application to display a different name. Please note that the version is displayed from the
version.pyfile and will be displayed in the title bar regardless of this fields setting.
ui.disclaimer-text: (optional - no disclaimer footer if omitted)Use: If present the text will be displayed as a message in the footer of the application. At some point this text may also be included on the footer of the reports as well.
When to Modify: Provide this if you need to provide any persistent messaging to your users such as a legal disclaimer (not currently used by ONAP)
ui.requirement-text: (optional - no requirement link in footer if omitted)Use: If present this will describe the requirements that are validated by the validation tool prepended by the word “Validating:”. Example: Validating: ONAP VNF Provider Heat Requirements (master)
When to Modify: If you have modified or extended the tests and you want the GUI to reference a different document than the ONAP requirements. Alternatively you can remove the setting and not show link to the requirements in the footer.
ui.requirement-url: (optional - no requirement link in footer if omitted)Use: If present this will be the link to the requirement text. It should be a full URL with protocol (ex: http://url.com ).
When to Modify: If you have modified or extended the tests and you want the GUI to reference a different document than the ONAP requirements. Alternatively you can remove the setting and not show link to the requirements in the footer.
categories: (optional)Use: This section allows operators to customize the validation categories that can be selected by the end users. Individual tests can be decorated with the
categorydecorator to mark them as distinct categories of tests. These tests will not be executed unless they are specifically requested using the--categorycommand line option.When to Modify: If you have packaged additional test cases under the
ice_validator/testsdirectory withcategorydecorators, then you can define them in this section to make them accessible via the GUI.Fields:
name: Descriptive name to display to the usercategory: Name used in thecategorydecoratordescription: Additional help text that will displayed upon hovering over the label in the GUI
settings.polling-frequency: (optional - default is 1 second)Use: The validations are run in a separate process. This setting defines how frequently (in milliseconds) the GUI is updated from the background process.
When to Modify: It’s unlikely this would need to be modified, but this could be tweaked to change the frequency of update if there are performance or latency concerns
settings.default-verbosity: (optional - default is Standard)Use: Controls the default level of verbosity in the pytest output.
When to Modify: Change this if you want to increase or decrease the default level of verbosity. Please note that once the user changes this setting, then the GUI will use the users last selection over this value.
Available Value:
Less- corresponds to pytest’s non verbose optionStandard- corresponds to pytest’s-voptionMore- corresponds to pytest’s-vvoption
Enabling Terms and Conditions Acceptance
There may be scenarios where an ONAP Operator wishes to gather end user approval or consent to specific terms prior to allowing the end user to use the validation tool. This could be in the form of an End User License Agreement, Terms and Conditions, or some other artifact.
This is also enabled through the vvp-config.yaml. This is configured
by defining a terms section in the file as follows:
terms:
    version: <version of terms being accepted>
    path: <relative path or url to the terms>
    popup-link-text: <message for link to terms>
    popup-msg-text: <message in the main body of the pop-up>
    popup-title: <text displayed in the title bar of pop-up dialog>
When this is enabled, a pop-up will be displayed blocking the users progress until the terms are reviewed (link clicked), and either accepted or declined.
If the user accepts, then their acceptance of version of the terms will be recorded and they will not need to re-accept unless the version is changed.
If the user declines, then the validation tool will immediately exit.
The actual terms and conditions will be opened in the user’s default browser. The path can be a local file path or an HTTP URL. If you wish for the content to be rendered in the browser, then it is recommended that the content be stored as HTML.