Backup and Restore Solution
Warning
This description is not covering the Backup & Restore procedure of the full ONAP platform, but gives examples for the usage of Velero. The ONAP community will focus on Disaster Recovery including B&R in the coming releases.
Problem Statement and Requirement (User Story)
As an ONAP Operator- We require the ability to backup and restore ONAP state data, We want to have Disaster recovery solution for ONAP deployment done over K8.
Basic Use case would be
Add/Update/Modify the POD Data or DB Data.
Simulate a Disaster
Restore using Backup.
POD Data/DB entries should be recovered.
Solution Description
Narrowed down upon a tool which can be used for K8 Backup and Restoration for ONAP deployments named as Velero (formerly Heptio-ARK)
Velero is an Opensource tool to back up and restore your Kubernetes cluster resources and persistent volumes. Velero lets you:
Take backups of your cluster and restore in case of loss.
Copy cluster resources across cloud providers. NOTE: Cloud volume migrations are not yet supported.
Replicate your production environment for development and testing environments.
Velero consists of
A server that runs on your cluster
A command-line client that runs locally
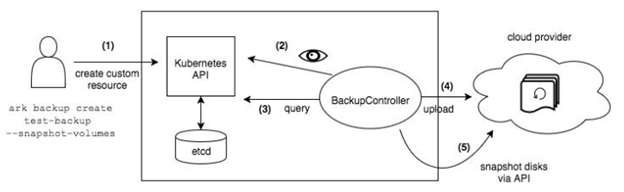
Working Flow diagram
Installation
Prerequisites
Access to a Kubernetes cluster, version 1.7 or later.
A DNS server on the cluster
kubectl installed
Labels should be defined there.
Install Velero Tool
Velero is an open source tool to safely backup and restore, perform disaster recovery, and migrate Kubernetes cluster resources and persistent volumes.
Go to Velero official website and Click on DOWNLOAD VELERO BUTTON. It will take you to the github page to download the latest version of velero. Scroll down to the bottom of the page and choose the binary corresponding to the OS where you want to run the Velero on.
Install and configure Velero Server and Client
To configure the latest version (1.5.2) of velero on Linux machine, please follow the below steps.
Run the below command. It will download the velero to your machine
wget https://github.com/vmware-tanzu/velero/releases/download/v1.5.2/velero-v1.5.2-linux-amd64.tar.gz
Extract it using below command
tar -zxvf velero-v1.5.2-linux-amd64.tar.gz
Once extracted, goto the directory “velero-v1.5.2-linux-amd64”
cd velero-v1.5.2-linux-amd64
Inside this you will find a directory called examples and then minio, just go inside it
cd examples/minio
Inside this you will find a file called 00-minio-deployment.yaml. Open this file using any editor and look for Velero service yaml portion, there you need to change the type from ClusterIP to NodePort
Once made the changes then run the below command to deploy velero server
kubectl apply -f 00-minio-deployment.yaml
This will configure the Velero with Minio. Minio is nothing but local storage with aws s3 capabilities. Velero support many cloud providers as well like Azure,AWS,GCP etc. You can configure any of those.
Once the Velero deployment is done, then we need to install and configure the velero server component using velero cli.
Create a Velero-specific credentials file (credentials-velero) in your local directory
[default]
aws_access_key_id=minio
aws_secret_access_key=minio123
Start the server and the local storage service. In the Velero directory, run
./velero install \
--provider aws \
--plugins velero/velero-plugin-for-aws:v1.0.0 \
--bucket velero \
--secret-file ./credentials-velero \
--use-volume-snapshots=false \
--backup-location-config region=minio,s3ForcePathStyle="true",s3Url=http://minio.velero.svc:9000
--use-restic
Refer this for more details: Setup Velero Server
Note
As Labels need to be defined, because that is a unique identity which we need to have for any backup of our k8 containers,
So in OOM code, Where -ever we don’t have labels, We need to define that whether its configmap or secret, for eg below:-
labels:
app: {{ include “common.name” . }} chart: {{ .Chart.Name }}-{{ .Chart.Version | replace “+” “_” }} release: {{ .Release.Name }} heritage: {{ .Release.Service }}
Running Velero Example (Backup and Restoration with Logs)
1) Install SO component
Note
This is an optional step, if you have already installed SO or all other components of ONAP then you can skip this step.
Below is the example of installing SO component using helm
helm install so -n bkup --namespace test3

NAME:   bkup

LAST DEPLOYED: Fri Jul 20 06:59:09 2018

NAMESPACE: test3

STATUS: DEPLOYED

RESOURCES:

==> v1/Pod(related)

NAME                         READY  STATUS    RESTARTS  AGE

bkup-so-db-744fccd888-w67zk  0/1    Init:0/1  0         0s

bkup-so-7668c746c-vngk8      0/2    Init:0/1  0         0s

==> v1/Secret

NAME        TYPE    DATA  AGE

bkup-so-db  Opaque  1     0s

==> v1/ConfigMap

NAME                      DATA  AGE

confd-configmap           1     0s

so-configmap              5     0s

so-docker-file-configmap  1     0s

so-filebeat-configmap     1     0s

so-log-configmap          11    0s


==> v1/PersistentVolume

NAME        CAPACITY  ACCESS MODES  RECLAIM POLICY  STATUS  CLAIM             STORAGECLASS  REASON  AGE

bkup-so-db  2Gi       RWX           Retain          Bound   test3/bkup-so-db  0s


==> v1/PersistentVolumeClaim

NAME        STATUS  VOLUME      CAPACITY  ACCESS MODES  STORAGECLASS  AGE

bkup-so-db  Bound   bkup-so-db  2Gi       RWX           0s


==> v1/Service

NAME   TYPE      CLUSTER-IP   EXTERNAL-IP  PORT(S)                                                                     AGE

so-db  NodePort  10.43.63.96  <none>       3306:30252/TCP                                                              0s

so     NodePort  10.43.59.93  <none>       8080:30223/TCP,3904:30225/TCP,3905:30224/TCP,9990:30222/TCP,8787:30250/TCP  0s


==> v1beta1/Deployment

NAME        DESIRED  CURRENT  UP-TO-DATE  AVAILABLE  AGE

bkup-so-db  1        1        1           0          0s

bkup-so     1        1        1           0          0s
Note
Get the application URL by running these commands
export NODE_PORT=$(kubectl get --namespace test3 -o jsonpath="{.spec.ports[0].nodePort}" services so)

export NODE_IP=$(kubectl get nodes --namespace test3 -o jsonpath="{.items[0].status.addresses[0].address}")

echo http://$NODE_IP:$NODE_PORT
2) Checking status of pod
kubectl get pods --all-namespaces | grep -i so

NAMESPACE       NAME                                    READY     STATUS             RESTARTS   AGE

test3           bkup-so-7668c746c-vngk8                 2/2       Running            0          8m

test3           bkup-so-db-744fccd888-w67zk             1/1       Running            0          8m
3) Creating backup of deployment
Here I am using selector label as release name
./velero backup create so-backup --selector release=bkup

Backup request "so-backup" submitted successfully.

Run `velero backup describe so-backup` for more details.
4) Checking backup logs
./velero backup describe so-backup

Name:         so-backup

Namespace:    velero

Labels:       <none>

Annotations:  <none>

Phase:  Completed


Namespaces:

   Included:  *

   Excluded:  <none>


Resources:

   Included:        *

   Excluded:        <none>

   Cluster-scoped:  auto


Label selector:  release=bkup


Snapshot PVs:  auto


TTL:  720h0m0s


Hooks:  <none>


Backup Format Version:  1

Started:    2018-07-20 07:09:51 +0000 UTC

Completed:  2018-07-20 07:09:53 +0000 UTC

Expiration:  2018-08-19 07:09:51 +0000 UTC

Validation errors:  <none>

Persistent Volumes: <none included>
5) Simulating a disaster
helm delete --purge bkup

release "bkup" deleted
6)Restoring the kubernetes resources using velero
./velero restore create --from-backup so-backup

 Restore request "so-backup-20180720071236" submitted successfully.

 Run `velero restore describe so-backup-20180720071236` for more details.
7) Checking restoration logs
./velero restore describe so-backup-20180720071236

Name:         so-backup-20180720071236

Namespace:    velero

Labels:       <none>

Annotations:  <none>


Backup:  so-backup

Namespaces:

  Included:  *

  Excluded:  <none>


Resources:

  Included:        *

  Excluded:        nodes, events, events.events.k8s.io, backups.ark.heptio.com, restores.ark.heptio.com

  Cluster-scoped:  auto


Namespace mappings:  <none>

Label selector:  <none>


Restore PVs:  auto

Phase:  Completed

Validation errors:  <none>

Warnings:  <none>

Errors:    <none>
8)Check backup files
As we are using Minio which is local storage with aws s3 capabilities. Thus our all the backup files are being stored in locally in Minio Pod. Let’s see where the backup files are being genreted.
kubectl get pod -n velero
NAME                      READY   STATUS      RESTARTS   AGE
minio-d9c56ff5-cg8zp      1/1     Running     0          4d5h
minio-setup-ph8pk         0/1     Completed   0          4d5h
velero-74cdf64d76-t8wfs   1/1     Running     0          4d5h
kubectl exec -it -n velero minio-d9c56ff5-cg8zp  ls storage/velero/backups/
so-backup
aarna@anod-master:~$

kubectl exec -it -n velero minio-d9c56ff5-cg8zp  ls storage/velero/backups/so-backup
so-backup-csi-volumesnapshotcontents.json.gz
so-backup-csi-volumesnapshots.json.gz
so-backup-logs.gz
so-backup-podvolumebackups.json.gz
so-backup-resource-list.json.gz
so-backup-volumesnapshots.json.gz
so-backup.tar.gz
velero-backup.json
9) Restore run
./velero  restore get

 NAME                          BACKUP         STATUS      WARNINGS   ERRORS    CREATED                         SELECTOR

 so-backup-20180720071236      so-backup      Completed   0          0         2018-07-20 07:12:36 +0000 UTC   <none>
10) Check the pod status
kubectl get pods --all-namespaces | grep -i so

NAMESPACE       NAME                                    READY     STATUS             RESTARTS   AGE

test3           bkup-so-7668c746c-vngk8                 2/2       Running            0          8m

test3           bkup-so-db-744fccd888-w67zk             1/1       Running            0          8m
Another Example with DB and PV Backup
APPC component backup and restoration
kubectl get pods --all-namespaces | grep -i appc
onap bk-appc-0 1/2 Running 0 1m
onap bk-appc-cdt-7cd6f6d674-5thwj 1/1 Running 0 1m
onap bk-appc-db-0 2/2 Running 0 1m
onap bk-appc-dgbuilder-59895d4d69-7rp9q 1/1 Running 0 1m
Creating dummy entry in db
kubectl exec -it -n default bk-appc-db-0 bash
Defaulting container name to appc-db.
Use 'kubectl describe pod/bk-appc-db-0 -n onap' to see all of the containers in this pod.
root@bk-appc-db-0:/#
root@bk-appc-db-0:/#
root@bk-appc-db-0:/#
root@bk-appc-db-0:/# mysql -u root -p
Enter password:
Welcome to the MySQL monitor. Commands end with ; or \g.
Your MySQL connection id is 42
Server version: 5.7.23-log MySQL Community Server (GPL)

Copyright (c) 2000, 2018, Oracle and/or its affiliates. All rights reserved.

Oracle is a registered trademark of Oracle Corporation and/or its
affiliates. Other names may be trademarks of their respective
owners.

Type 'help;' or '\h' for help. Type '\c' to clear the current input statement.

mysql>
mysql>
mysql>
mysql> connect mysql
Reading table information for completion of table and column names
You can turn off this feature to get a quicker startup with -A

Connection id: 44
Current database: mysql

mysql>
mysql>
mysql> select * from servers;
Empty set (0.00 sec)

mysql> desc servers;
+-------------+----------+------+-----+---------+-------+
| Field | Type | Null | Key | Default | Extra |
+-------------+----------+------+-----+---------+-------+
| Server_name | char(64) | NO | PRI | | |
| Host | char(64) | NO | | | |
| Db | char(64) | NO | | | |
| Username | char(64) | NO | | | |
| Password | char(64) | NO | | | |
| Port | int(4) | NO | | 0 | |
| Socket | char(64) | NO | | | |
| Wrapper | char(64) | NO | | | |
| Owner | char(64) | NO | | | |
+-------------+----------+------+-----+---------+-------+
9 rows in set (0.00 sec)

mysql> insert into servers values ("test","ab","sql","user","pwd",1234,"test","wrp","vaib");
Query OK, 1 row affected (0.03 sec)

mysql>
mysql>
mysql>
mysql> select * from servers;
+-------------+------+-----+----------+----------+------+--------+---------+-------+
| Server_name | Host | Db | Username | Password | Port | Socket | Wrapper | Owner |
+-------------+------+-----+----------+----------+------+--------+---------+-------+
| abc | ab | sql | user | pwd | 1234 | test | wrp | vaib |
+-------------+------+-----+----------+----------+------+--------+---------+-------+
1 row in set (0.00 sec)

mysql>
mysql>
mysql> exit
Bye
root@bk-appc-db-0:/#
root@bk-appc-db-0:/#
root@bk-appc-db-0:/# exit
command terminated with exit code 127
kubectl get pods --all-namespaces | grep -i appc
onap bk-appc-0 1/2 Running 0 5m
onap bk-appc-cdt-7cd6f6d674-5thwj 1/1 Running 0 5m
onap bk-appc-db-0 2/2 Running 0 5m
onap bk-appc-dgbuilder-59895d4d69-7rp9q 1/1 Running 0 5m
Creating dummy file in APPC PV
kubectl exec -it -n onap bk-appc-0 bash
Defaulting container name to appc.
Use 'kubectl describe pod/bk-appc-0 -n onap' to see all of the containers in this pod.
root@bk-appc-0:/#
root@bk-appc-0:/#
root@bk-appc-0:/#
root@bk-appc-0:/# cd /opt/opendaylight/current/daexim/
root@bk-appc-0:/opt/opendaylight/current/daexim# ls
root@bk-appc-0:/opt/opendaylight/current/daexim# ls
root@bk-appc-0:/opt/opendaylight/current/daexim#
root@bk-appc-0:/opt/opendaylight/current/daexim#
root@bk-appc-0:/opt/opendaylight/current/daexim# touch abc.txt
root@bk-appc-0:/opt/opendaylight/current/daexim# ls
abc.txt
root@bk-appc-0:/opt/opendaylight/current/daexim# exit
exit
root@rancher:~/oom/kubernetes# kubectl get pods --all-namespaces | grep -i appc
onap bk-appc-0 1/2 Running 0 6m
onap bk-appc-cdt-7cd6f6d674-5thwj 1/1 Running 0 6m
onap bk-appc-db-0 2/2 Running 0 6m
onap bk-appc-dgbuilder-59895d4d69-7rp9q 1/1 Running 0 6m
Creating backup using velero
./velero backup create appc-bkup1 --selector release=bk
 Backup request "appc-bkup1" submitted successfully.
 Run `velero backup describe appc-bkup1` for more details.

 ./velero backup describe appc-bkup1
 Name: appc-bkup1
 Namespace: velero
 Labels: <none>
 Annotations: <none>

 Phase: Completed

 Namespaces:
 Included: *
 Excluded: <none>

 Resources:
 Included: *
 Excluded: <none>
 Cluster-scoped: auto

 Label selector: release=bk

 Snapshot PVs: auto

 TTL: 720h0m0s

 Hooks: <none>

 Backup Format Version: 1

 Started: 2018-08-27 05:07:45 +0000 UTC
 Completed: 2018-08-27 05:07:47 +0000 UTC

 Expiration: 2018-09-26 05:07:44 +0000 UTC

 Validation errors: <none>

 Persistent Volumes: <none included>
Simulating disaster by deleting APPC
helm delete --purge bk
release "bk" deleted
Restoration using velero
./velero restore create --from-backup appc-bkup1
Restore request "appc-bkup1-20180827052651" submitted successfully.
Run `velero restore describe appc-bkup1-20180827052651` for more details.
Restoration details
Check the Restoration details immediately after restoration. Restoration process is in InProgress Phase. Please check the Phase.
./velero restore describe appc-bkup1-20180827052651
Name: appc-bkup1-20180827052651
Namespace: velero
Labels: <none>
Annotations: <none>

Backup: appc-bkup1

Namespaces:
Included: *
Excluded: <none>

Resources:
Included: *
Excluded: nodes, events, events.events.k8s.io, backups.ark.heptio.com, restores.ark.heptio.com
Cluster-scoped: auto

Namespace mappings: <none>

Label selector: <none>

Restore PVs: auto

Phase: InProgress

Validation errors: <none>

Warnings: <none>
Errors: <none>
./velero restore describe appc-bkup1-20180827052651
Name: appc-bkup1-20180827052651
Namespace: velero
Labels: <none>
Annotations: <none>

Backup: appc-bkup1

Namespaces:
Included: *
Excluded: <none>

Resources:
Included: *
Excluded: nodes, events, events.events.k8s.io, backups.ark.heptio.com, restores.ark.heptio.com
Cluster-scoped: auto

Namespace mappings: <none>

Label selector: <none>

Restore PVs: auto

Phase: Completed

Validation errors: <none>


Warnings:   <error getting warnings: Get "http://minio.velero.svc:9000/velero/restores/dev-appc-1-20201108164330/restore-dev-appc-1-20201108164330-results.gz?X-Amz-Algorithm=AWS4-HMAC-SHA256&X-Amz-Credential=minio%2F20201108%2Fminio%2Fs3%2Faws4_request&X-Amz-Date=20201108T183923Z&X-Amz-Expires=600&X-Amz-SignedHeaders=host&X-Amz-Signature=847bdbb0a76718220c40767c4837aa999a4da9ff1344e9b42d3c93f7009e6898": dial tcp: lookup minio.velero.svc on 127.0.0.53:53: no such host>

Errors:  <error getting errors: Get "http://minio.velero.svc:9000/velero/restores/dev-appc-1-20201108164330/restore-dev-appc-1-20201108164330-results.gz?X-Amz-Algorithm=AWS4-HMAC-SHA256&X-Amz-Credential=minio%2F20201108%2Fminio%2Fs3%2Faws4_request&X-Amz-Date=20201108T183923Z&X-Amz-Expires=600&X-Amz-SignedHeaders=host&X-Amz-Signature=847bdbb0a76718220c40767c4837aa999a4da9ff1344e9b42d3c93f7009e6898": dial tcp: lookup minio.velero.svc on 127.0.0.53:53: no such host>
This process might take some time to complete. When you check the Restoration details again after some time then the phase will show as Completed as shown below.
./velero restore describe appc-bkup1-20180827052651
 Name: appc-bkup1-20180827052651
 Namespace: velero
 Labels: <none>
 Annotations: <none>

 Backup: appc-bkup1

 Namespaces:
 Included: *
 Excluded: <none>

 Resources:
 Included: *
 Excluded: nodes, events, events.events.k8s.io, backups.ark.heptio.com, restores.ark.heptio.com
 Cluster-scoped: auto

 Namespace mappings: <none>

 Label selector: <none>

 Restore PVs: auto

 Phase: Completed

 Validation errors: <none>

 Warnings:   <error getting warnings: Get "http://minio.velero.svc:9000/velero/restores/dev-appc-1-20201108164330/restore-dev-appc-1-20201108164330-results.gz?X-Amz-Algorithm=AWS4-HMAC-SHA256&X-Amz-Credential=minio%2F20201108%2Fminio%2Fs3%2Faws4_request&X-Amz-Date=20201108T183923Z&X-Amz-Expires=600&X-Amz-SignedHeaders=host&X-Amz-Signature=847bdbb0a76718220c40767c4837aa999a4da9ff1344e9b42d3c93f7009e6898": dial tcp: lookup minio.velero.svc on 127.0.0.53:53: no such host>

 Errors:  <error getting errors: Get "http://minio.velero.svc:9000/velero/restores/dev-appc-1-20201108164330/restore-dev-appc-1-20201108164330-results.gz?X-Amz-Algorithm=AWS4-HMAC-SHA256&X-Amz-Credential=minio%2F20201108%2Fminio%2Fs3%2Faws4_request&X-Amz-Date=20201108T183923Z&X-Amz-Expires=600&X-Amz-SignedHeaders=host&X-Amz-Signature=847bdbb0a76718220c40767c4837aa999a4da9ff1344e9b42d3c93f7009e6898": dial tcp: lookup minio.velero.svc on 127.0.0.53:53: no such host>
List of restores
ark restore get
NAME BACKUP STATUS WARNINGS ERRORS CREATED SELECTOR
appc-bkup-20180827045955 appc-bkup Completed 2 0 2018-08-27 04:59:52 +0000 UTC <none>
appc-bkup1-20180827052651 appc-bkup1 Completed 5 0 2018-08-27 05:26:48 +0000 UTC <none>
vid-bkp-20180824053001 vid-bkp Completed 149 2 2018-08-24 05:29:59 +0000 UTC <none>
Completed status means the Restoration is done successfully.
Restoration successful
kubectl get pods --all-namespaces | grep -i appc
onap bk-appc-0 1/2 Running 0 26m
onap bk-appc-cdt-7cd6f6d674-5thwj 1/1 Running 0 26m
onap bk-appc-db-0 2/2 Running 0 26m
onap bk-appc-dgbuilder-59895d4d69-7rp9q 1/1 Running 0 26m
kubectl exec -it -n onap bk-appc-db-0 bash
Defaulting container name to appc-db.
Use 'kubectl describe pod/bk-appc-db-0 -n onap' to see all of the containers in this pod.
root@bk-appc-db-0:/#
root@bk-appc-db-0:/#
root@bk-appc-db-0:/#
Restoration of db successful
root@bk-appc-db-0:/# mysql -u root
ERROR 1045 (28000): Access denied for user 'root'@'localhost' (using password: NO)
root@bk-appc-db-0:/# mysql -u root -p
Enter password:
Welcome to the MySQL monitor. Commands end with ; or \g.
Your MySQL connection id is 335
Server version: 5.7.23-log MySQL Community Server (GPL)

Copyright (c) 2000, 2018, Oracle and/or its affiliates. All rights reserved.

Oracle is a registered trademark of Oracle Corporation and/or its
affiliates. Other names may be trademarks of their respective
owners.

Type 'help;' or '\h' for help. Type '\c' to clear the current input statement.

mysql> connect mysql
Reading table information for completion of table and column names
You can turn off this feature to get a quicker startup with -A

Connection id: 337
Current database: mysql

mysql> select * from servers;
+-------------+------+-----+----------+----------+------+--------+---------+-------+
| Server_name | Host | Db | Username | Password | Port | Socket | Wrapper | Owner |
+-------------+------+-----+----------+----------+------+--------+---------+-------+
| abc | ab | sql | user | pwd | 1234 | test | wrp | vaib |
+-------------+------+-----+----------+----------+------+--------+---------+-------+
1 row in set (0.00 sec)

mysql> quit
Bye
root@bk-appc-db-0:/# exit
exit
Restoration of PV successful
kubectl get pods --all-namespaces | grep -i appc
onap bk-appc-0 1/2 Running 0 27m
onap bk-appc-cdt-7cd6f6d674-5thwj 1/1 Running 0 27m
onap bk-appc-db-0 2/2 Running 0 27m
onap bk-appc-dgbuilder-59895d4d69-7rp9q 1/1 Running 0 27m
kubectl exec -it -n onap bk-appc-0 bash
Defaulting container name to appc.
Use 'kubectl describe pod/bk-appc-0 -n onap' to see all of the containers in this pod.
root@bk-appc-0:/#
root@bk-appc-0:/#
root@bk-appc-0:/#
root@bk-appc-0:/#
root@bk-appc-0:/# cd /opt/opendaylight/current/daexim/
root@bk-appc-0:/opt/opendaylight/current/daexim# ls
abc.txt
root@bk-appc-0:/opt/opendaylight/current/daexim#
root@bk-appc-0:/opt/opendaylight/current/daexim#
root@bk-appc-0:/opt/opendaylight/current/daexim# exit
exit
Use Cases
Disaster recovery
Using Schedules and Restore-Only Mode
If you periodically back up your cluster resources, you are able to return to a previous state in case of some unexpected mishap, such as a service outage.
Cluster migration
Using Backups and Restores
Velero can help you port your resources from one cluster to another, as long as you point each Velero Config to the same cloud object storage.
References: https://github.com/vmware-tanzu/velero