Service Design
Goal: Add models and other artifacts required to create, configure, instantiate, and manage services. Validate and certify the services. Besides the manual creation of a Service Model, an existing model can be imported via a CSAR file
Tool: SDC
SDC user roles: Designer
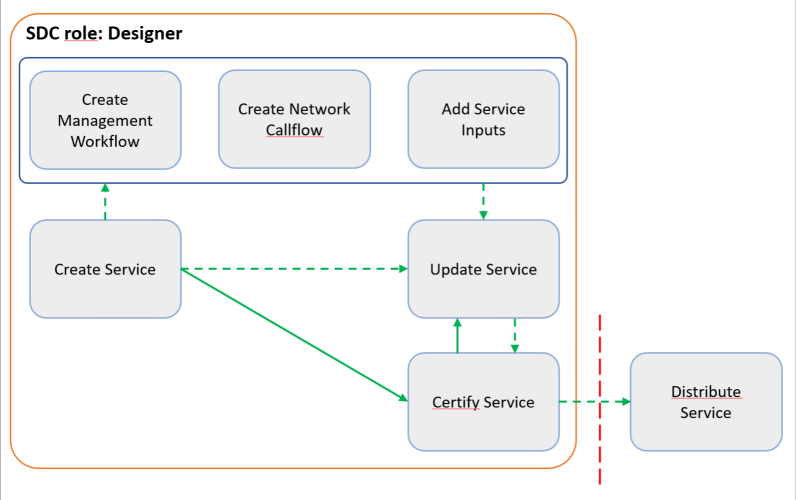
Figure: Workflow for Service design
Steps
Create Service
Prerequisites: Create VF/PNFs required for this service (see VF/PNF Creation and Testing).
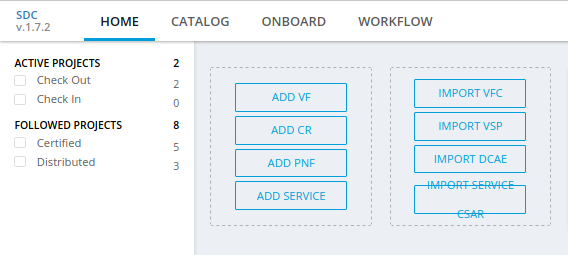
From the SDC HOME page, hover over Add and select ADD SERVICE.
In the General section, complete all fields.
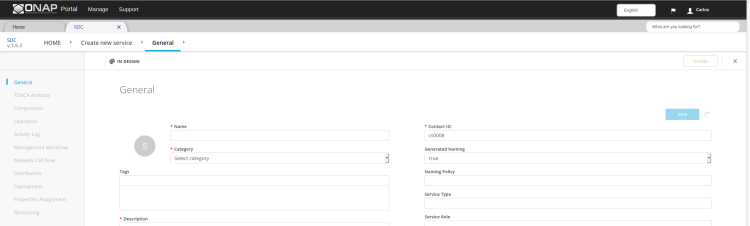
Click Create.
A message displays when Service creation is complete.
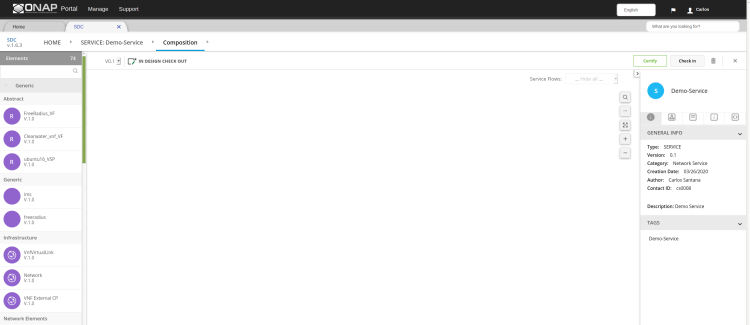
Click Composition in the left pane.
For a description of the Composition section (see SDC User Guide ).
Drag one or more elements from the Elements palette to the canvas.
To connect elements:
Hover over an element and then hover over
 .
.Other elements that can connect to this element are highlighted.
Drag to a highlighted element on the canvas.
Select options for Requirements and Capabilities.
Click on Finish.
To add artifacts at the service level:
Click an empty area in the canvas and click Deployment Artifacts (right pane).
Click
 .
.Select the type.
Click Browse, locate a file to upload, and click Open.
Complete all other fields.
Click Done.
Use this function to add YANG artifacts for distribution to SDNC.
[Optional] At any time before checking in the Service, click these options to update Service information:
Note
These tasks can be done only before certifying the Service.
General->Icon change the icon associated with the Service
TOSCA Artifacts view and edit artifacts, such as the .csar file and TOSCA template
Composition view or edit the graphical representation of the service-level TOSCA model
Activity Log view activity related to the Service (displays the action, date, user, status, and any comments related to each action)
Management Workflow model service lifecycle workflows for execution in SO (see Create a Management Workflow [optional])
Network Call Flow model interactions among VFs (see Create a Network Callflow [optional])
Deployment view HEAT modules in VSPs
Properties Assignment define or update properties, policies and input parameters used during Service instantiation.
Monitoring …
Click Check In to save changes.
A box displays for confirming the changes.
Enter a comment and click OK.
A message displays when the Service is checked in and the Home page is displayed.
After creating a service and configuring optional fields, certify it (see Certify Service).
Note: Create Service can also be invoked via External SDC API. Refer SDC REST API reference for details of the API. Currently, only a ‘Partner Domain Service’ category is supported which cannot be created manually from SDC portal.
Create a Management Workflow [optional]
Create a workflow to model the SO recipes of the service life cycle such as instantiation, upgrade, termination, or suspension of a service or VNF. In the workflow each of the Activity, represent API calls to various ONAP components (such as OOF, SDN-C, App-C, etc) that perform a business function needed.
Note: The information collected in this section is represented in BPMN format and included in distributed service model.
- Prerequisites: All the required ActivitySpec as supported by SO
are registered in SDC.
From the SDC HOME page, click CATALOG and search for a service.
Click the service and click Check Out.
Select the panel Management Workflow.
Click Add Workflow.
The Create New Workflow box displays.
Complete all fields.
Click Save.
Specify Inputs & Outputs of Workflow
Define the Composition of Workflow.
All the Tasks in the composition are expected to be ServiceTask for using Activities defined in SO.
Select the Implementation in the Task “general” tab to Activity.
Select the required ActivitySpec.
Mark the workflow as executable by selecting the Executable flag in the workflow “general” tab.
Click Save.
Certify the Workflow.
Create a Network Callflow [optional]
Create a network callflow to model the interactions among VFs within a service, such how VFs interact to deliver a service while the service is being consumed. In the model, lifelines represent VFs.
Note: The information collected in this section is not distributed with the service model.
Prerequisites: Create service
From the SDC HOME page, click CATALOG and search for the service.
Click the service and click Check Out.
Click Network Call Flow.
Click Add Workflow. The Create New Workflow box displays.
Complete all fields.
Click Save.
In the new workflow pane, click the Lifelines icon.
The LIFELINES/STEPS view displays.
To add a lifeline (component), do the following:
Click LIFELINES to expand the pane.
Click Add Lifeline.
In the [Unnamed Lifeline field], enter a name for the lifeline.
To add other lifelines to the workflow, repeat the actions above.
After creating all required lifelines, do the following to add a step (showing an action between two lifelines):
Under STEPS (left pane), click Add Message. An unnamed step is added under STEPS.
In the [Unnamed Message] field, enter a name or message for the step.
From the component and arrow dropdown lists, select the two components that communicate in this step, and the arrow to show in which direction the communication flows.
To add another step, repeat the actions above.
[Optional] Change the order of steps by clicking a step and dragging it to the preferred position.
Click Save. You will be redirected to the Network Call Flow page.
Go to the General tab and click on Check In to save changes.
If needed, certify the service again (see Certify Service).
Manage Service Properties [optional]
Add new Service parameters and define as input fields during Service instantiation.
Prerequisites: Create service
From the SDC HOME page, click CATALOG and search for a service.
Click the service and click Check Out.
Click Properties Assignment.
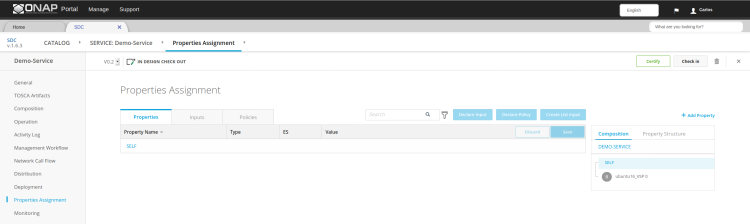
From the Composition pane, select the SELF object representing the service.
In the Properties the existing Service properites are shown
With +Add Property you can add a new property
To set a property as Input parameter, select the parameter by clicking the check box in each row as required. Note: Do not select inputs that are already in the ENV file (this overwrites values specified in the ENV).
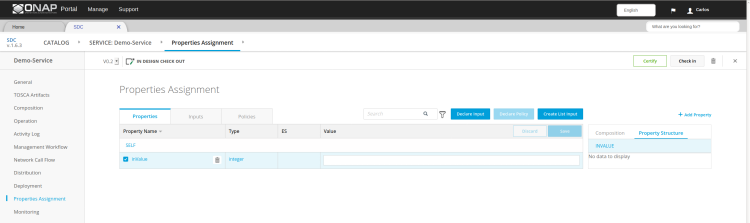
Click Declare Input to add the selected parameter to the Service Input pane.
Click Check In to save changes.
After adding Service Inputs, certify it (see Certify Service).
Update Service [optional]
Update service information and artifacts.
Update the version of a VF referenced in the service whenever the VF is updated (see step 4).
Prerequisites:
Create a service.
If a VF included in the service was updated: see Update a VF/PNF [optional]
From the SDC HOME page, click CATALOG and search for the service.
Click the service and click Check Out.
Click Composition.
To update the version of a VF referenced in the service:
Click Composition.
Click the VF in the canvas.
On the General Info tab (right pane), select the VF version.
To update artifacts at the service level:
Click an empty area in the canvas and click Deployment Artifacts (right pane).
View, add, delete, or download artifacts as required.
[Optional] Add, edit, or remove VFs that comprise the service reference architecture (see steps 4 to 6 in Create Service).
[Optional] Click Operations to edit Service Operations.
Create/Edit Operations
Assign Workflow
Click Save
[Optional] Click Management Workflow to edit, upload, or delete associated deployment artifacts (see Create a Management Workflow [optional]).
[Optional] Click Network Callflow to edit the interactions among VFs that comprise the service (see Create a Network Callflow [optional]).
[Optional] Click Properties Assignement to select parameters as input fields during Service instantiation.
Click Check In to save changes.
After updating a service and configuring optional fields, certify it (see Certify Service).
Certify Service
Note: A service cannot be submitted for testing if the reference architecture contains uncertified resources.
Prerequisites: Create Service
Steps
When a Service is ready for certification, click CATALOG and search for the checked-in Service.
Click the Service and click Certify.
Enter a comment and click OK.
A Message appears, that the Service is certified.
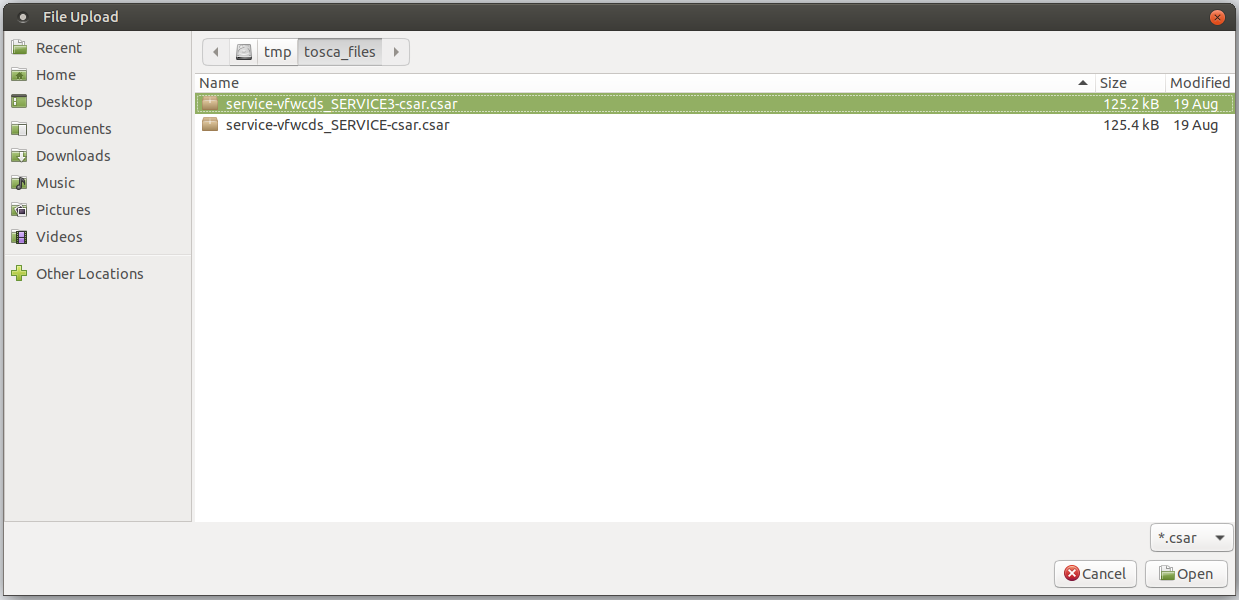
Import Service CSAR [optional]
Note: This step can be used, when a Service Model already exists
Steps
From the SDC HOME page, hover over IMPORT and select IMPORT SERVICE CSAR.
In the File Upload Dialog, select the csar file and press Open.
In the General section, complete all fields.
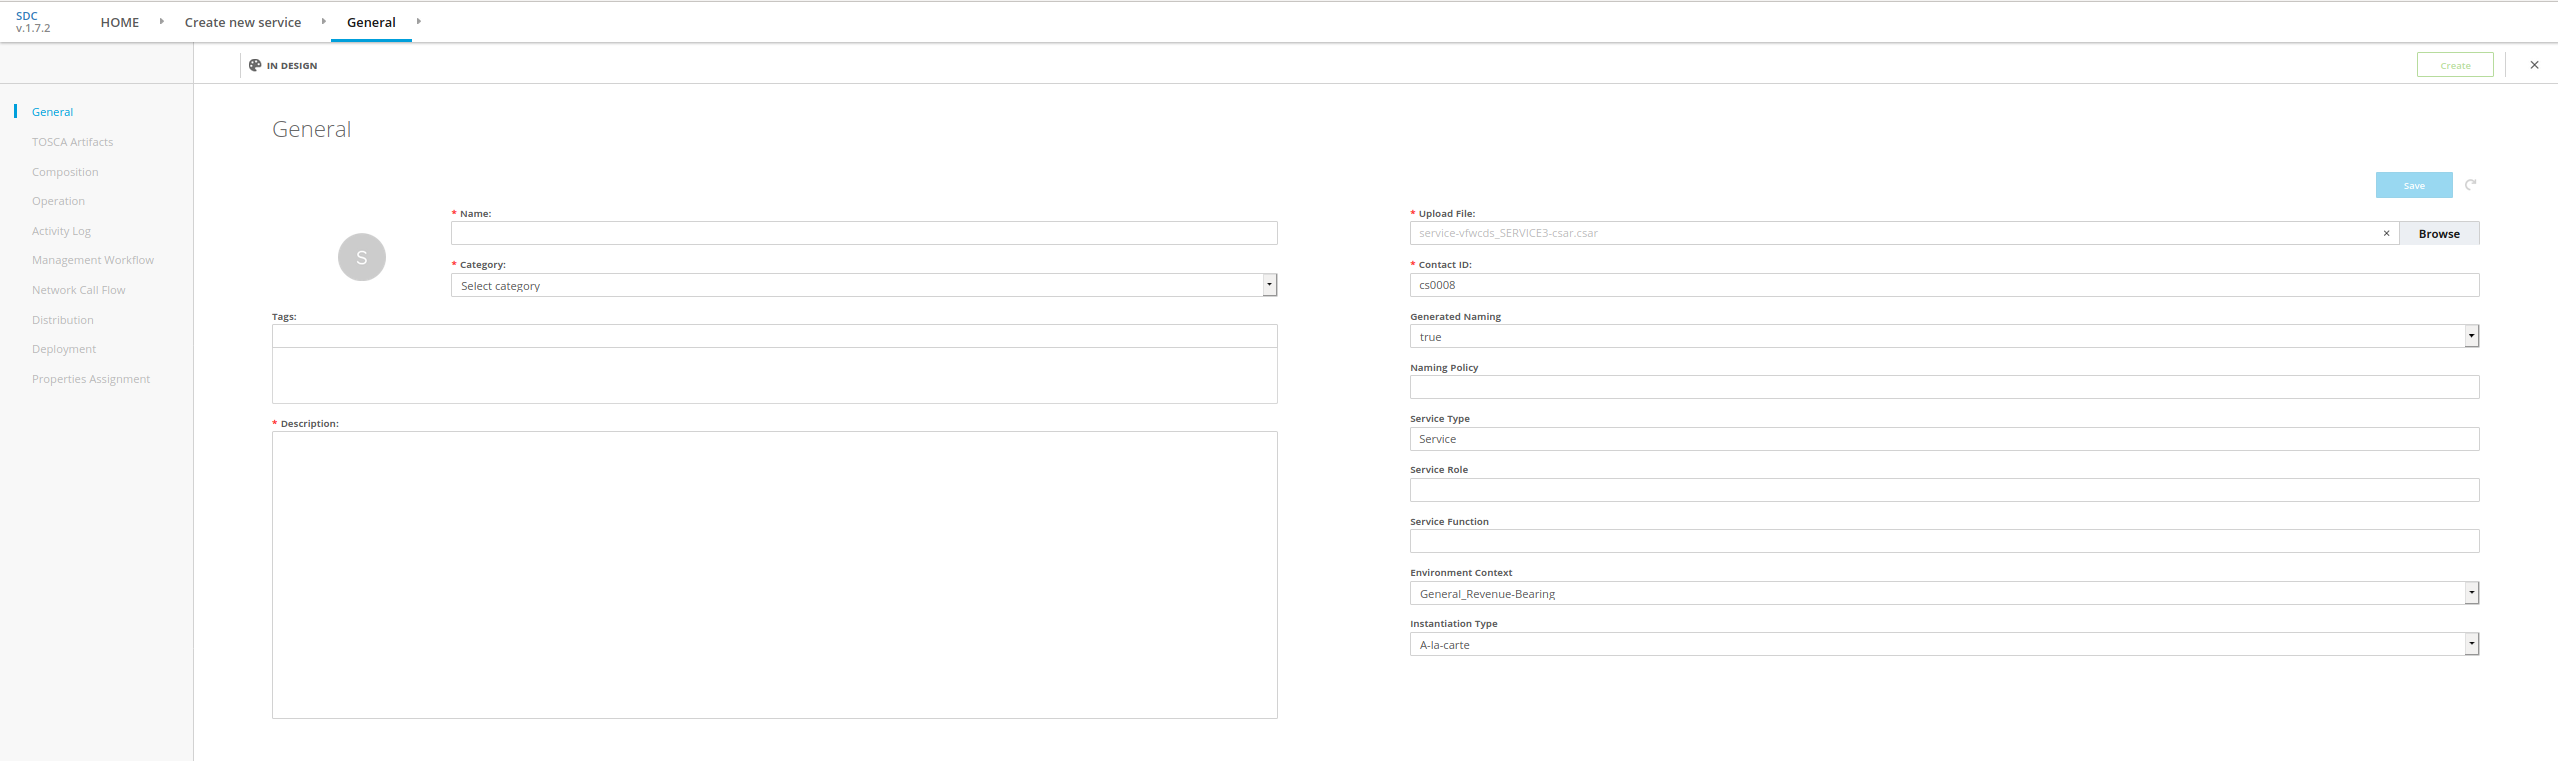
Click Create.
A message displays when Service creation is complete.
Continue with Service Design steps mentioned above